はじめに
Screen Space Reflection はカメラから見た画のみを利用してレイトレした結果を使い、擬似的な反射画をそこそこのコストで作り出すテクニックです。Reflection Probe と異なり、動的なものにも効きますし、それなりに正しい反射した画が得られます。
- kode80 - Screen Space Reflections in Unity 5
- Temporal Screen Space Reflections - primitive: blog
- http://esbrog.hatenablog.com/entry/2016/03/30/022538
勉強のために一から書いてみたのですが、なかなか大変だったので実装過程をメモ書きして残しておきました。
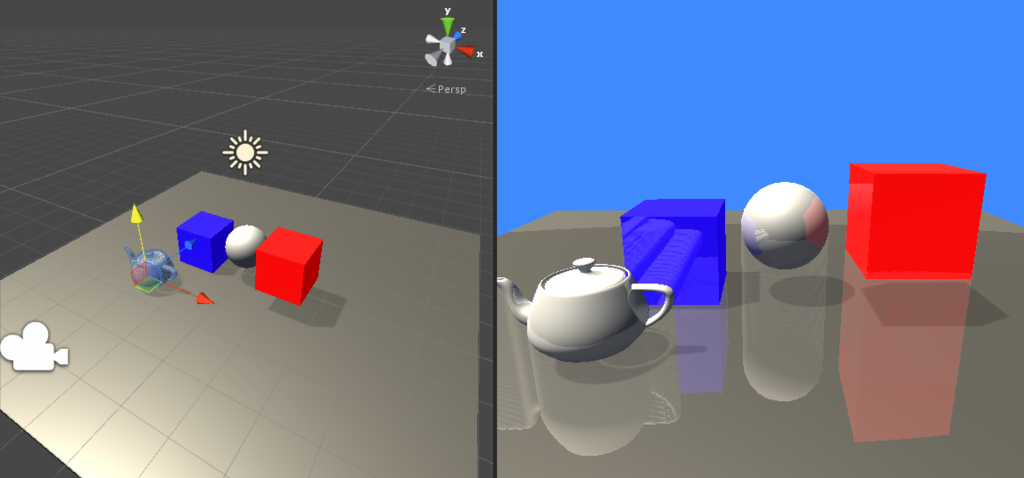
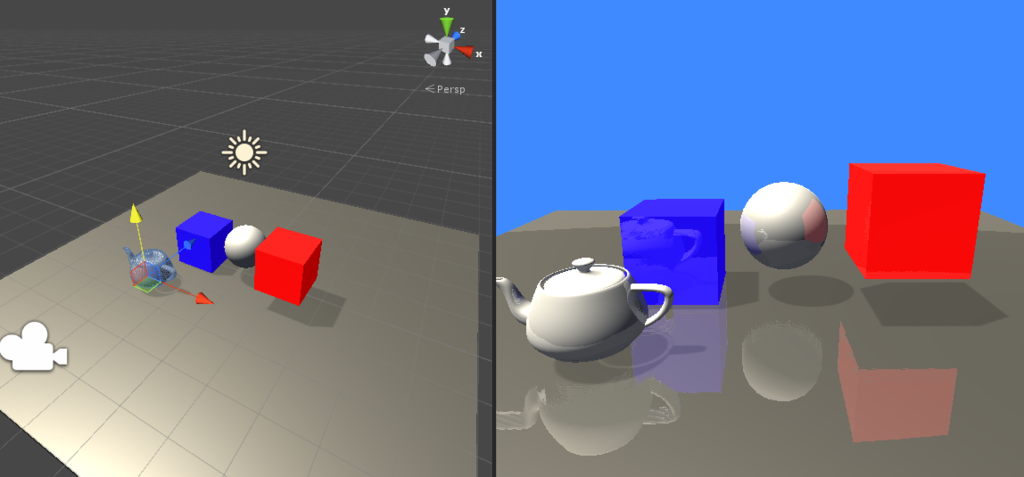
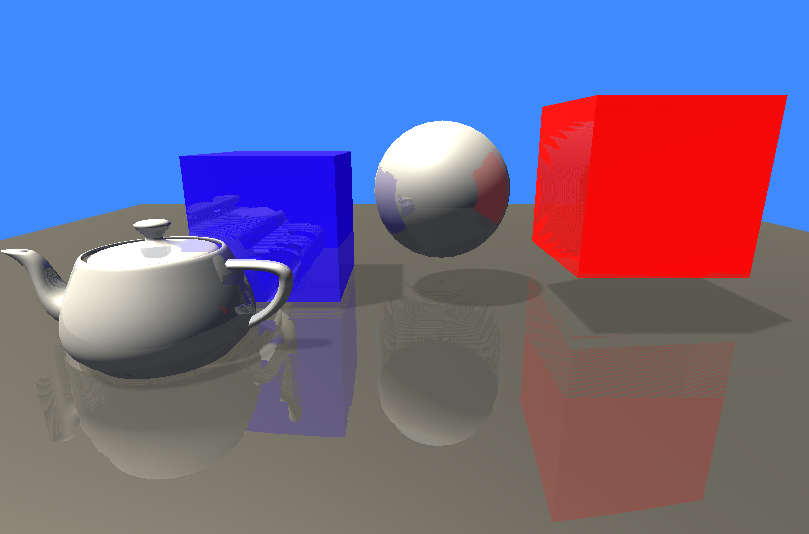
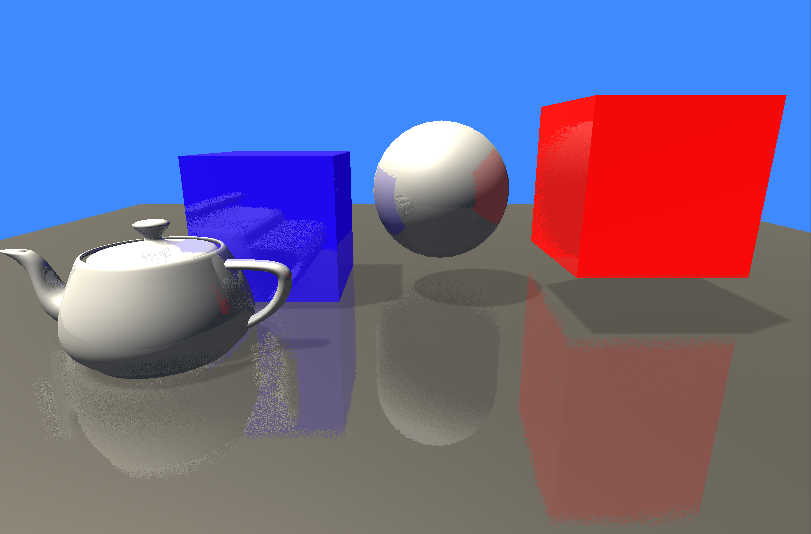
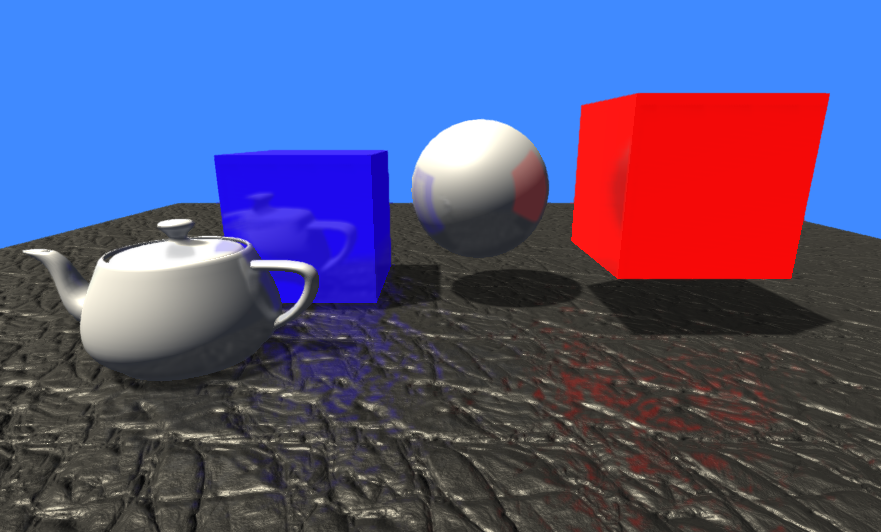
デモ
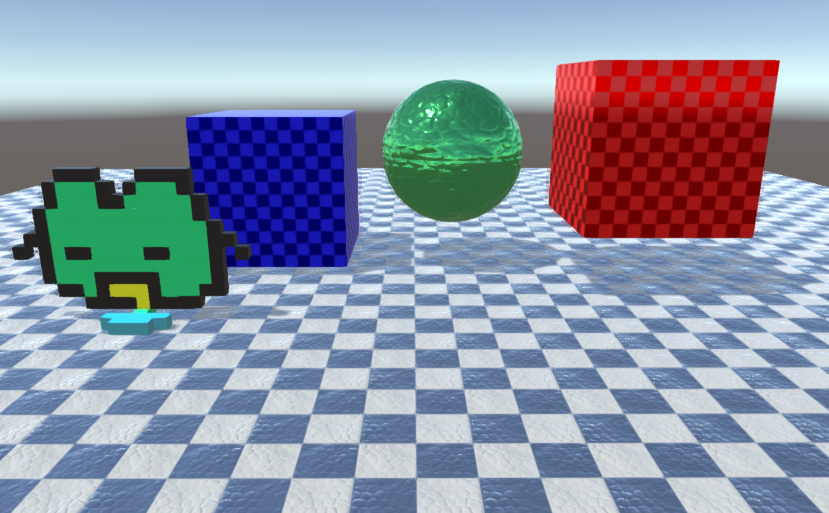
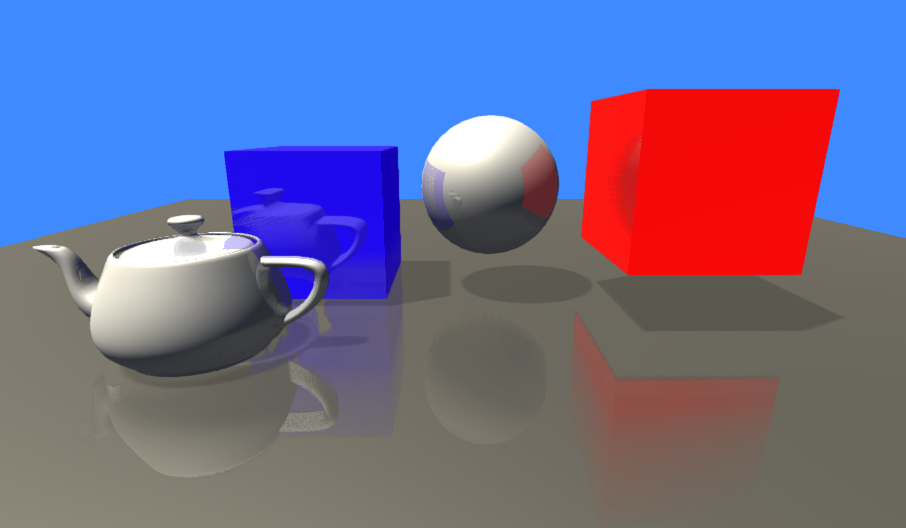
何もしない時
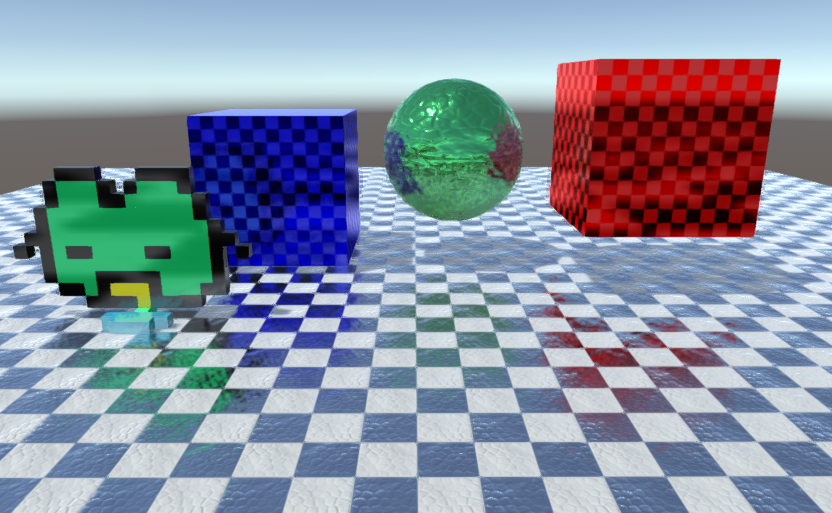
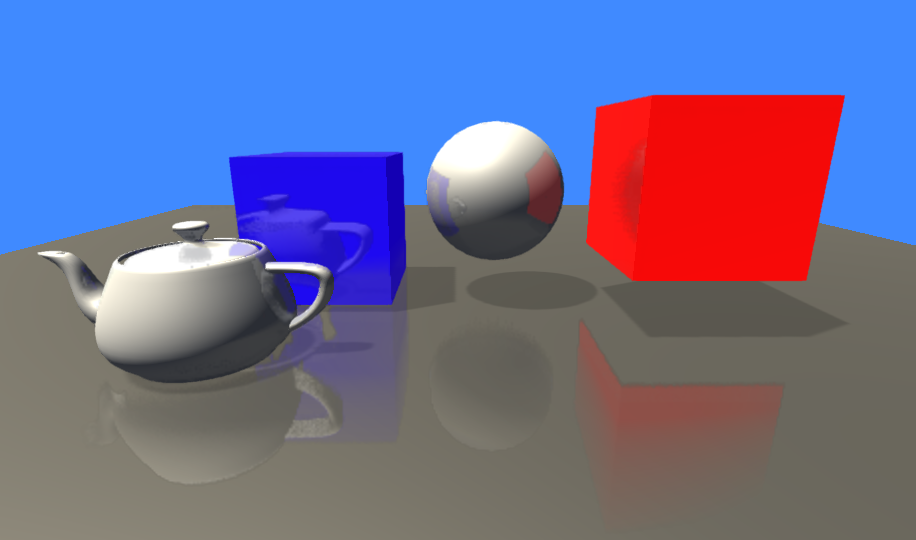
SSR を ON

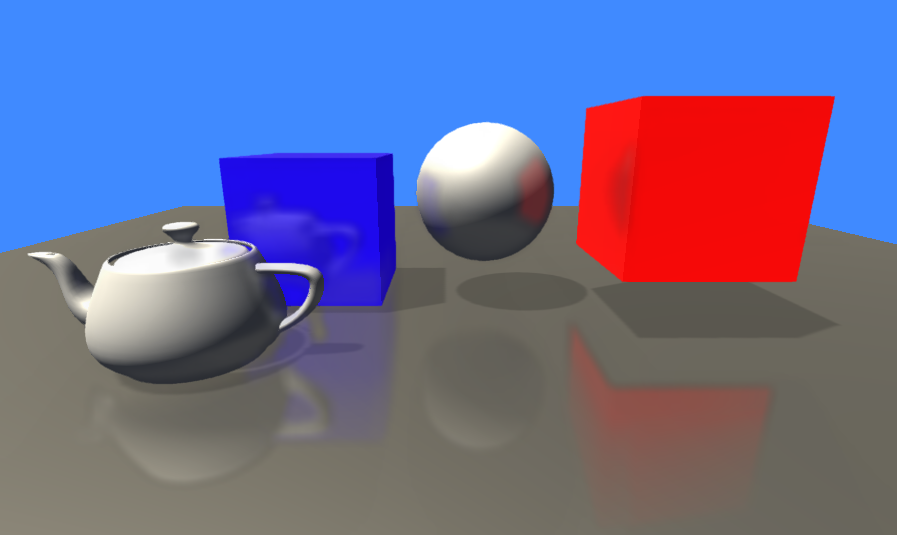
w/ Reflection Probe(床のみ Static)
環境
- Windows 8.1
- Unity 5.3.4f1
Camera.depthTextureMode を ON にすれば Forward レンダリングでもデプスおよび法線を描画したテクスチャを利用できますが、ここでは面倒なのと後々スペキュラやスムースネスも利用したいため、Deferred レンダリング下での Image Effect を利用して実装します。
コード
まずは適当に実装してみる
スクリプト
using UnityEngine;

[RequireComponent(typeof(Camera))]
[ExecuteInEditMode]
public class ScreenSpaceLocalReflection : MonoBehaviour
{
    [SerializeField] Shader shader;
    Material material_;

    [ImageEffectOpaque]
    void OnRenderImage(RenderTexture src, RenderTexture dst)
    {
        if (material_ == null) {
            material_ = new Material(shader);
        }

        var camera = GetComponent<Camera>();
        var view = camera.worldToCameraMatrix;
        var proj = GL.GetGPUProjectionMatrix(camera.projectionMatrix, false);
        var viewProj = proj * view;
        material_.SetMatrix("_ViewProj", viewProj);
        material_.SetMatrix("_InvViewProj", viewProj.inverse);

        Graphics.Blit(src, dst, material_, 0);
    }
}
Image Effect を実行する簡単なスクリプトです。カメラのビュー・プロジェクション行列およびその逆行列を変数として登録していますが、これは後で利用します。
ワールド座標復元
まずは直感的に分かりやすいようにワールド座標で計算してみます。
Shader "Hidden/ScreenSpaceLocalReflection"
{

Properties
{
    _MainTex("Base (RGB)", 2D) = "" {}
}

SubShader
{

Blend Off
ZTest Always
ZWrite Off
Cull Off

CGINCLUDE

#include "UnityCG.cginc"

sampler2D _MainTex;
sampler2D _CameraDepthTexture;
float4x4 _InvViewProj;
float4x4 _ViewProj;

struct appdata
{
    float4 vertex : POSITION;
    float2 uv : TEXCOORD0;
};

struct v2f
{
    float4 vertex : SV_POSITION;
    float4 screenPos : TEXCOORD0;
};

v2f vert(appdata v)
{
    v2f o;
    o.vertex = mul(UNITY_MATRIX_MVP, v.vertex);
    o.screenPos = ComputeScreenPos(o.vertex);
    return o;
}

float4 frag(v2f i) : SV_Target
{
    float2 uv = i.screenPos.xy / i.screenPos.w;
    float4 col = tex2D(_MainTex, uv);

    float depth = SAMPLE_DEPTH_TEXTURE(_CameraDepthTexture, uv);
    if (depth >= 1.0) return col;

    float2 spos = 2.0 * uv - 1.0;
    float4 pos = mul(_InvViewProj, float4(spos, depth, 1.0));
    pos = pos / pos.w;

    return pos;
}

ENDCG

Pass
{
    CGPROGRAM
    #pragma vertex vert
    #pragma fragment frag
    ENDCG
}

}

}
これでワールド座標がシェーダ内で得られます。
レイを飛ばす
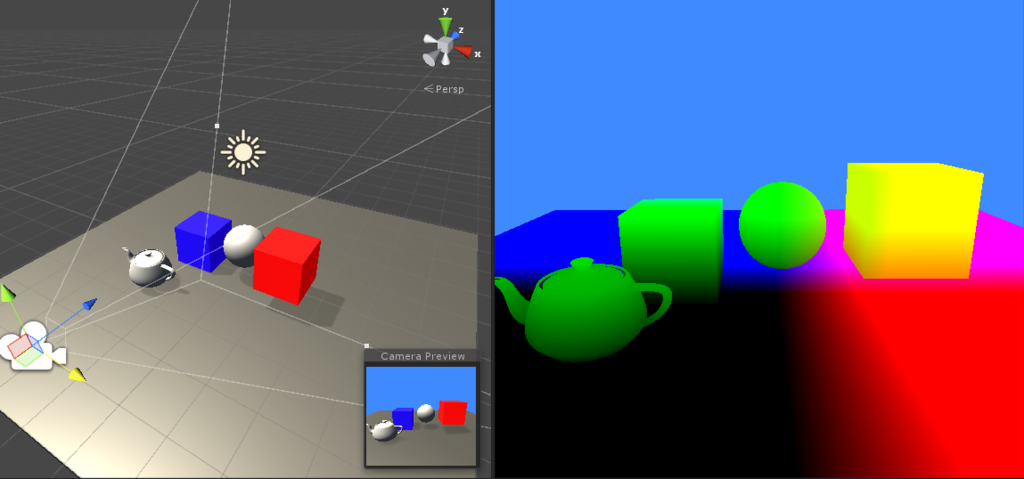
こうして得られたワールド座標を使ってカメラからのレイを計算、G-Buffer から法線を取得、そしてこれらを使って、カメラから指定ピクセルへの座標を通って反射するベクトルを計算します。
sampler2D _CameraGBufferTexture2;
...
float3 camDir = normalize(pos - _WorldSpaceCameraPos);
float3 normal = tex2D(_CameraGBufferTexture2, uv) * 2.0 - 1.0;
float3 refDir = normalize(camDir - 2.0 * dot(camDir, normal) * normal);
refDir を見てみると次のようになっています。
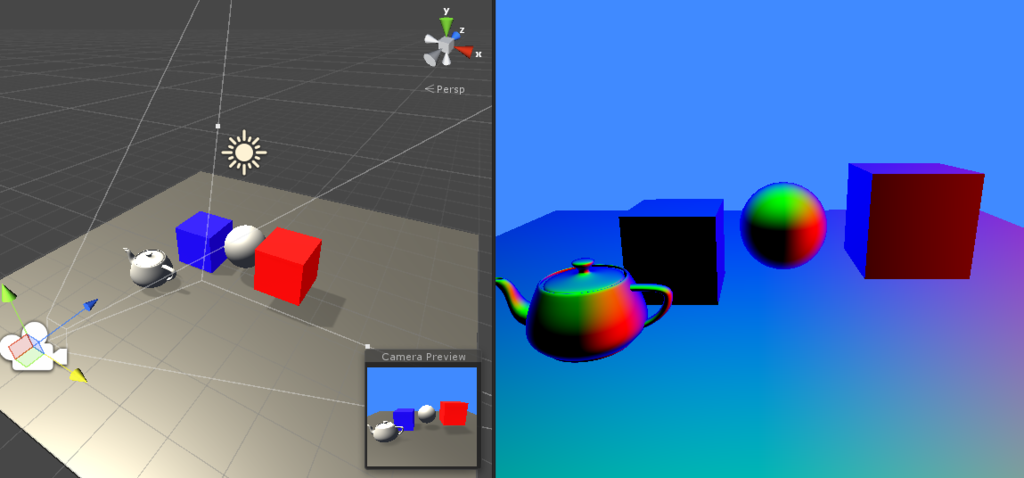
XYZ が RGB に割り当てられるため、レイが当たって右に反射しそうな場所は赤、上に反射しそうな場所は緑、奥にそのまま進みそうなところは青くなっています。
レイが当たるまで調べる
こうして得られたベクトルをちょっとずつ伸ばして当たるところまで調べます。
int maxRayNum = 100;
float3 step = 2.0 / maxRayNum * refDir;

for (int n = 1; n <= maxRayNum; ++n) {
    float3 rayPos = pos + step * n;
    float4 vpPos = mul(_ViewProj, float4(rayPos, 1.0));
    float2 rayUv = vpPos.xy / vpPos.w * 0.5 + 0.5;
    float rayDepth = ComputeDepth(vpPos);
    float gbufferDepth = SAMPLE_DEPTH_TEXTURE(_CameraDepthTexture, rayUv);
    if (rayDepth - gbufferDepth > 0) {
        col += tex2D(_MainTex, rayUv) * 0.2;
        break;
    }
}
レイの位置をスクリーン座標へと変換し、そこからレイの深度および G-Buffer の深度を比較してレイのほうが奥側にあった(= レイがめり込んだ)ら、そのピクセル座標を現在のピクセルへ加算してみます。
奥側に行ったら加算、なので物体の厚みが考えられていないため、縦に長くなってしまいます。これを避けるためには、適当な厚さを定義して、それをもとに衝突判定を行うようにします。
float maxThickness = 0.3 / maxRayNum;

for (int n = 1; n <= maxRayNum; ++n) {
    ...
    if (rayDepth - gbufferDepth > 0 && rayDepth - gbufferDepth < maxThickness) {
        ...
    }
}
それっぽくなりました。もちろん角度によるところはあるので、スクリーン上から判断できない場所では破綻が生じます。動かすと次のような感じです。
kode80 の記事ではここで定義した maxThickness の代わりに、裏側のデプスを別のバッファへ描画し、それを利用していました。ちょっと処理が複雑になるため、本エントリでは省略します。
レイの衝突判定の精度を高める
先ほどのコードではレイを 100 分割していました。これだと結構負荷が大きくなるため、10 分割にしてみます(※アルファブレンドに変更しました)。

すると繰り返しのようなパターンが生じます。これはレイの間隔が大きすぎることで、対象の衝突点発見までのループが飛び飛びになり、参照する UV 座標に行き来が発生してしまうことに因ります。
二分探索
kode80 の記事 を参照すると、これを避けるために二分探索をしてレイの精度を高める方法が載っています。これを試してみます。
for (int n = 1; n <= maxRayNum; ++n)
{
    ...
    if (rayDepth - gbufferDepth > 0 && rayDepth - gbufferDepth < maxThickness) {
        float sign = -1.0;
        for (int m = 1; m <= 4; ++m) {
            rayPos += sign * pow(0.5, m) * step;
            vpPos = mul(_ViewProj, float4(rayPos, 1.0));
            rayUv = vpPos.xy / vpPos.w * 0.5 + 0.5;
            rayDepth = ComputeDepth(vpPos);
            gbufferDepth = SAMPLE_DEPTH_TEXTURE(_CameraDepthTexture, rayUv);
            sign = rayDepth - gbufferDepth > 0 ? -1 : 1;
        }
        col = col * 0.8 + tex2D(_MainTex, rayUv) * 0.2;
        break;
    }
}
ストライド間隔は狭くなりましたが、そもそもステップ数が少ないのと maxThickness による誤差の影響が大きいため改善...とはいえない感じです。裏側も描画している状態であれば改善したかもしれません。
ノイズを加える
レイにノイズを加える方法も書いてあるので、そちらを試してみます。ノイズ関数は以下のものを利用させていただきます。
float noise(float2 seed)
{
    return frac(sin(dot(seed.xy, float2(12.9898, 78.233))) * 43758.5453);
}

...
for (int n = 1; n <= maxRayNum; ++n)
{
    float3 rayPos = pos + step * (n + noise(uv + _Time.x));
    ...
}
ノイズは 0 - 1 の大きさで、これをそのままループの n に乗っけてみます(ここでは二分探索のコードは除いています)。
ストライドがバラけて良い感じになっています。実行してみてみると、ノイズが更に時間で変わって分散するためより違和感が減ります。ループを上げるともう少しいい感じになります。以下はループ数を 30 にして試したものです。
ブラーを掛けたり平均計算用のバッファを設けてそこに書き込んだりすればもう少し良くなりそうな感じがします。
フェード
距離に応じてフェード
距離に応じてフェードしてみます。
int maxRayNum = 30;
float maxLength = 2.0;
float3 step = maxLength / maxRayNum * refDir;
float maxThickness = 0.2 / maxRayNum;

for (int n = 1; n <= maxRayNum; ++n) {
    float3 ray = (n + noise(uv + _Time.x)) * step;
    float3 rayPos = pos + ray;
    float4 vpPos = mul(_ViewProj, float4(rayPos, 1.0));
    float2 rayUv = vpPos.xy / vpPos.w * 0.5 + 0.5;
    float rayDepth = ComputeDepth(vpPos);
    float gbufferDepth = SAMPLE_DEPTH_TEXTURE(_CameraDepthTexture, rayUv);
    if (rayDepth - gbufferDepth > 0 && rayDepth - gbufferDepth < maxThickness) {
        float a = 0.2 * pow(min(1.0, (maxLength / 2) / length(ray)), 2.0);
        col = col * (1 - a) + tex2D(_MainTex, rayUv) * a;
        break;
    }
}
画面端でフェード
レイが画面外に行ってしまった場合、次のように画が伸びたような形になってしまいます。

これを避けるために画面外に行ったら棄却する処理と、レイが画面端に行くにつれフェードアウトする処理を追加してみます。
for (int n = 1; n <= maxRayNum; ++n) {
    ...
    if (max(abs(rayUv.x - 0.5), abs(rayUv.y - 0.5)) > 0.5) break;
    ...
    if (rayDepth - gbufferDepth > 0 && rayDepth - gbufferDepth < maxThickness) {
        float edgeFactor = 1.0 - pow(2.0 * length(rayUv - 0.5), 2);
        float a = 0.5 * pow(min(1.0, (maxLength / 2) / length(ray)), 2.0) * edgeFactor;
        a *= pow(length(rayUv - 0.5) / 0.5, 0.5);
        col = col * (1 - a) + tex2D(_MainTex, rayUv) * a;
        break;
    }
}

平均化
ノイズ低減のために i-saint さんの記事に載っていた RenderTexture を使った平均化を行ってみます。
スクリプト
まず、C# 側のコードを次のように変更します。
...
public class ScreenSpaceLocalReflection : MonoBehaviour
{
    Mesh screenQuad_;
    RenderTexture[] accumulationTextures_ = new RenderTexture[2];

    Mesh CreateQuad()
    {
        Mesh mesh = new Mesh();
        mesh.name = "Quad";
        mesh.vertices = new Vector3[4] {
            new Vector3( 1f, 1f, 0f),
            new Vector3(-1f, 1f, 0f),
            new Vector3(-1f,-1f, 0f),
            new Vector3( 1f,-1f, 0f),
        };
        mesh.triangles = new int[6] {
            0, 1, 2,
            2, 3, 0
        };
        return mesh;
    }

    void ReleaseAccumulationTexture()
    {
        for (int i = 0; i < 2; ++i) {
            if (accumulationTextures_[i] != null) {
                accumulationTextures_[i].Release();
                accumulationTextures_[i] = null;
            }
        }
    }

    void UpdateAccumulationTexture()
    {
        var camera = GetComponent<Camera>();

        for (int i = 0; i < 2; ++i) {
            var resolution = new Vector2(camera.pixelWidth, camera.pixelHeight);
            if (accumulationTextures_[i] != null && (
                accumulationTextures_[i].width  != (int)resolution.x ||
                accumulationTextures_[i].height != (int)resolution.y
            )) {
                ReleaseAccumulationTexture();
            }

            if (accumulationTextures_[i] == null || !accumulationTextures_[i].IsCreated()) {
                accumulationTextures_[i] = new RenderTexture((int)resolution.x, (int)resolution.y, 0, RenderTextureFormat.ARGB32);
                accumulationTextures_[i].filterMode = FilterMode.Bilinear;
                accumulationTextures_[i].useMipMap = false;
                accumulationTextures_[i].generateMips = false;
                accumulationTextures_[i].enableRandomWrite = true;
                accumulationTextures_[i].Create();
                Graphics.SetRenderTarget(accumulationTextures_[i]);
                GL.Clear(false, true, new Color(0, 0, 0, 0));
            }
        }
    }

    [ImageEffectOpaque]
    void OnRenderImage(RenderTexture src, RenderTexture dst)
    {
        if (screenQuad_ == null) {
            screenQuad_ = CreateQuad();
        }

        UpdateAccumulationTexture();

        ...

        var reflectionTexture = RenderTexture.GetTemporary(
            camera.pixelWidth,
            camera.pixelHeight,
            0,
            RenderTextureFormat.ARGB32);
        reflectionTexture.filterMode = FilterMode.Bilinear;

        Graphics.Blit(src, reflectionTexture, material_, 0);
        material_.SetTexture("_ReflectionTexture", reflectionTexture);

        material_.SetTexture("_PreAccumulationTexture", accumulationTextures_[1]);
        Graphics.SetRenderTarget(accumulationTextures_[0]);
        material_.SetPass(1);
        Graphics.DrawMeshNow(screenQuad_, Matrix4x4.identity);

        material_.SetTexture("_AccumulationTexture", accumulationTextures_[0]);
        Graphics.SetRenderTarget(dst);
        Graphics.Blit(src, dst, material_, 2);

        RenderTexture.ReleaseTemporary(reflectionTexture);

        var tmp = accumulationTextures_[1];
        accumulationTextures_[1] = accumulationTextures_[0];
        accumulationTextures_[0] = tmp;
    }
}
スワップ用も含め平均化用の RenderTexture を 2 枚用意しています。シェーダ側では新たに 2 つのパスを追加し、1 つ目は時間方向に均す用のパス、2 つ目はそうして作成されたテクスチャをコンポジットするパスです。描画は Graphics.Blit() を使うのではなく、フルスクリーンの矩形ポリゴンを描画し、そのテクスチャに情報を書き込みます。
シェーダ
パスを 2 個追加します。また、反射を計算していたパスも、出力を _MainTex とブレンドするのではなく、反射成分のみ返すように変更します。 また、矩形描画がフルスクリーンになるように、別の頂点シェーダ用の関数も作成します。
Shader "Hidden/ScreenSpaceLocalReflection"
{
...

sampler2D _ReflectionTexture;
sampler2D _PreAccumulationTexture;
sampler2D _AccumulationTexture;

...

v2f vert_fullscreen(appdata v)
{
    v2f o;
    o.vertex = v.vertex;
    o.screenPos = ComputeScreenPos(o.vertex);
    return o;
}

float4 frag_reflection(v2f i) : SV_Target
{
    ...
    for (int n = 1; n <= maxRayNum; ++n) {
        ...
        if (rayDepth - gbufferDepth > 0 && rayDepth - gbufferDepth < maxThickness) {
            ...
            col = float4(tex2D(_MainTex, rayUv).xyz, a);
            break;
        }
    }

    return col;
}

float4 frag_accumulation(v2f i) : SV_Target
{
    float2 uv = i.screenPos.xy / i.screenPos.w;
    float4 base = tex2D(_PreAccumulationTexture, uv);
    float4 reflection = tex2D(_ReflectionTexture, uv);
    float blend = 0.2;
    return lerp(base, reflection, blend);
}

float4 frag_composition(v2f i) : SV_Target
{
    float2 uv = i.screenPos.xy / i.screenPos.w;
    float4 base = tex2D(_MainTex, uv);
    float4 reflection = tex2D(_AccumulationTexture, uv);
    float a = reflection.a;
    return lerp(base, reflection, a);
}

ENDCG

Pass
{
    CGPROGRAM
    #pragma vertex vert
    #pragma fragment frag_reflection
    ENDCG
}

Pass
{
    CGPROGRAM
    #pragma vertex vert_fullscreen
    #pragma fragment frag_accumulation
    ENDCG
}

Pass
{
    CGPROGRAM
    #pragma vertex vert
    #pragma fragment frag_composition
    ENDCG
}

}

}
結果

未だノイズは見えますが滑らかになりました。
モーションブラー低減
この方式には問題があって、カメラを動かした時にモーションブラーのようになってしまいます。これを避けるために、i-saint さんの記事に載っているように、前フレームのビュープロジェクション行列を保存しておき、平均用のバッファを参照する UV はそれを利用するようにします。普通は頂点シェーダで計算すれば良いと思うのですが、Raymarching して形状を変更させたオブジェクトだとダメになるので、それを見越してフラグメントシェーダで書いています。横の移動には少し弱いですが、回転にはピタッとくっつく感じがします。
スクリプト
...
public class ScreenSpaceLocalReflection : MonoBehaviour
{
    ...
    Matrix4x4 preViewProj_ = Matrix4x4.identity;

    ...
    void OnRenderImage(RenderTexture src, RenderTexture dst)
    {
        ...
        if (preViewProj_ == Matrix4x4.identity) {
            preViewProj_ = viewProj;
        }
        material_.SetMatrix("_PreViewProj", preViewProj_);
        ...
        Graphics.DrawMeshNow(screenQuad_, Matrix4x4.identity);
        ...
        preViewProj_ = viewProj;
    }
}
前フレームのビュー・プロジェクション行列を与えるようにします。
シェーダ
...
float4x4 _PreViewProj;
...

float4 frag_accumulation(v2f i) : SV_Target
{
    // 現在のワールド座標を復元
    float2 uv = i.screenPos.xy / i.screenPos.w;
    float depth = SAMPLE_DEPTH_TEXTURE(_CameraDepthTexture, uv);
    if (depth >= 1.0) return float4(0, 0, 0, 0);
    float2 spos = 2.0 * uv - 1.0;
    float4 pos = mul(_InvViewProj, float4(spos, depth, 1.0));
    pos = pos / pos.w;

    // 前の UV を復元
    float4 preVpPos = mul(_PreViewProj, pos);
    float2 preUv = preVpPos.xy / preVpPos.w * 0.5 + 0.5;

    // 前のフレームまでの平均結果と現在のフレームの結果を合成
    float4 accumulation = tex2D(_PreAccumulationTexture, preUv);
    float4 reflection = tex2D(_ReflectionTexture, uv);
    float blend = 0.1;
    return lerp(accumulation, reflection, blend);
}
結果
コード
並進に弱いのと、物体を動かした場合はブラーが生じてしまうのだけが欠点ですがかなり良くなります。カメラの移動速度をパラメタ化して、それをブレンド比率に反映させるのが良いかもしれません。
解像度変更
パフォーマンスのために解像度を変更してみます。これは簡単で、先ほど平均用の描画をしたのと同じように矩形ポリゴンを解像度を下げた RenderTexture へと描画するように変更してみます。
スクリプト
public class ScreenSpaceLocalReflection : MonoBehaviour
{
    ...
    [Range(0f, 1f)][SerializeField] float resolution = 0.5f;
    int width  { get { return (int)(GetComponent<Camera>().pixelWidth  * resolution); } }
    int height { get { return (int)(GetComponent<Camera>().pixelHeight * resolution); } }
    ...

    void UpdateTexture(ref RenderTexture texture, RenderTextureFormat format)
    {
        if (texture != null && (texture.width  != width || texture.height != height)) {
            ReleaseTexture(ref texture);
        }

        if (texture == null || !texture.IsCreated()) {
            texture = new RenderTexture(width, height, 0, format);
            texture.filterMode = FilterMode.Bilinear;
            texture.useMipMap = false;
            texture.generateMips = false;
            texture.enableRandomWrite = true;
            texture.Create();
            Graphics.SetRenderTarget(texture);
            GL.Clear(false, true, new Color(0, 0, 0, 0));
        }
    }
    ...

    void OnRenderImage(RenderTexture src, RenderTexture dst)
    {
        ...
        var reflectionTexture = RenderTexture.GetTemporary(width, height, 0, RenderTextureFormat.ARGB32);
        ...
    }
}
結果
等倍
0.5 倍
0.2 倍

ブラー
より自然に見えるようにブラーのパスを追加してみます。
スクリプト
平均の計算の前のパスにブラーのパスを追加します。
...
public class ScreenSpaceLocalReflection : MonoBehaviour
{
    [SerializeField] Vector2 blurOffset = new Vector2(1f, 1f);
    [SerializeField] uint blurNum = 3;

    ...
    void OnRenderImage(RenderTexture src, RenderTexture dst)
    {
        ...
        var xBlurTexture = RenderTexture.GetTemporary(width, height, 0, RenderTextureFormat.ARGB32);
        xBlurTexture.filterMode = FilterMode.Bilinear;
        var yBlurTexture = RenderTexture.GetTemporary(width, height, 0, RenderTextureFormat.ARGB32);
        yBlurTexture.filterMode = FilterMode.Bilinear;

        ...
        if (blurNum > 0) {
            Graphics.SetRenderTarget(xBlurTexture);
            material_.SetVector("_BlurParams", new Vector4(blurOffset.x, 0f, blurNum, 0));
            material_.SetPass(1);
            Graphics.DrawMeshNow(screenQuad_, Matrix4x4.identity);
            material_.SetTexture("_ReflectionTexture", xBlurTexture);

            Graphics.SetRenderTarget(yBlurTexture);
            material_.SetVector("_BlurParams", new Vector4(0f, blurOffset.y, blurNum, 0));
            material_.SetPass(1);
            Graphics.DrawMeshNow(screenQuad_, Matrix4x4.identity);
            material_.SetTexture("_ReflectionTexture", yBlurTexture);
        }
        ...
    }
}
シェーダ
...
float4 _BlurParams;
#define _BlurOffset _BlurParams.xy
#define _BlurNum (int)(_BlurParams.z)
...

float4 frag_blur(v2f i) : SV_Target
{
    float2 uv = i.screenPos.xy / i.screenPos.w;
    float2 size = _ReflectionTexture_TexelSize;

    float4 col = 0.0;
    for (int n = -_BlurNum; n <= _BlurNum; ++n) {
        col += tex2D(_ReflectionTexture, uv + _BlurOffset * size * n);
    }
    return col / (_BlurNum * 2 + 1);
}

...
Pass
{
    CGPROGRAM
    #pragma vertex vert_fullscreen
    #pragma fragment frag_blur
    ENDCG
}
...
結果
境界面の修正
ブラーを掛けて気づいたのですが、境界でちょっと黒ずんでいます。これは _ReflectionTexture を作る時に、float4(0, 0, 0, 0) で初期化しているため、黒がブラーとしてかかってしまうことによります。これを修正するために、リフレクションの計算のパスを修正します。
シェーダ
float4 frag_reflection(v2f i) : SV_Target
{
    float2 uv = i.screenPos.xy / i.screenPos.w;
    float4 col = float4(tex2D(_MainTex, uv).xyz, 0);

    float depth = SAMPLE_DEPTH_TEXTURE(_CameraDepthTexture, uv);
    if (depth >= 1.0) return col;
    ...
結果
綺麗になりました。
パラメタ化
いくつか決め打ちで書いていたパラメタを変更できるようにします。
クオリティの追加
ループ数をクオリティに応じて変更するようにします。途中で break しているため変数に出来ないので、シェーダキーワードを使います。
スクリプト
enum Quality { High, Middle, Low }
[SerializeField] Quality quality = Quality.Middle;
シェーダ
#if QUALITY_HIGH
    #define RAYTRACE_LOOP_NUM 50
#elif QUALITY_MIDDLE
    #define RAYTRACE_LOOP_NUM 30
#else // QUALITY_LOW
    #define RAYTRACE_LOOP_NUM 10
#endif

...
int maxRayNum = RAYTRACE_LOOP_NUM;
for (int n = 1; n <= maxRayNum; ++n) {
    ...
}
...

Pass
{
    CGPROGRAM
    #pragma multi_compile QUALITY_HIGH QUALITY_MIDDLE QUALITY_LOW
    #pragma vertex vert
    #pragma fragment frag_reflection
    ENDCG
}
レイトレのパラメタ
こちらもパラメタ化しておきましょう。レイの最大距離や仮定したものの厚みのパラメタなどです。加えて、フェードなどの処理をした結果、ちょっと反射した画が薄くなってしまっているため、これを強めるパラメタも追加しておきます。
スクリプト
...
[SerializeField] float raytraceMaxLength = 2f;
[SerializeField] float raytraceMaxThickness = 0.2f;
[Range(0f, 5f)][SerializeField] float reflectionEnhancer = 1f;
[Range(0f, 1f)][SerializeField] float accumulationBlendRatio = 0.1f;
...

material_.SetVector("_Params1", new Vector4(
    raytraceMaxLength,
    raytraceMaxThickness,
    reflectionEnhancer,
    accumulationBlendRatio));
シェーダ
float4 _Params1;
#define _RaytraceMaxLength        _Params1.x
#define _RaytraceMaxThickness     _Params1.y
#define _ReflectionEnhancer       _Params1.z
#define _AccumulationBlendRatio   _Params1.w

...
int maxRayNum = RAYTRACE_LOOP_NUM;
float maxLength = _RaytraceMaxLength;
float3 step = maxLength / maxRayNum * refDir;
float maxThickness = _RaytraceMaxThickness / maxRayNum;
...

for (int n = 1; n <= maxRayNum; ++n) {
    ...
    if (...) {
        ...
        a *= _ReflectionEnhancer * pow(length(rayUv - 0.5) / 0.5, 0.5);
        ...
    }
}
法線マップの反映
物理パラメタの反映について見ていきます。実は法線マップについては何もしなくても反映されます。これは法線マップテクスチャが G-Buffer に書き込まれているためです。
結果
スペキュラの反映
スペキュラは最後のコンポジションのパスで、どれだけの成分をブレンドするかの比率に掛け合わせることで実現出来ます。
シェーダ
// rgb: specular, a: smoothness
sampler2D _CameraGBufferTexture1;

inline float3 GetSpecular(float2 uv)
{
    return tex2D(_CameraGBufferTexture1, uv).xyz;
}

float4 frag_composition(v2f i) : SV_Target
{
    float2 uv = i.screenPos.xy / i.screenPos.w;
    float4 base = tex2D(_MainTex, uv);
    float4 reflection = tex2D(_AccumulationTexture, uv);
    float3 a = reflection.a * GetSpecular(uv);
    return lerp(base, reflection, a;
}
結果
Skybox と Reflection Probe もつけてマテリアルを Standard (Specular setup)に変更しました。

ラフネスの反映
ブラーのパスを使いまわして、ブラーが大きくかかったテクスチャを作成しておき、適当に補間します。
スクリプト
[Range(3, 10)][SerializeField] int maxSmoothness = 5;
...

material_.SetTexture("_ReflectionTexture", accumulationTextures_[1]);

Graphics.SetRenderTarget(xBlurredTexture);
material_.SetVector("_BlurParams", new Vector4(blurOffset.x, 0f, maxSmoothness, 0));
material_.SetPass(1);
Graphics.DrawMeshNow(screenQuad_, Matrix4x4.identity);

Graphics.SetRenderTarget(yBlurredTexture);
material_.SetTexture("_ReflectionTexture", xBlurredTexture);
material_.SetVector("_BlurParams", new Vector4(0f, blurOffset.y, maxSmoothness, 0));
material_.SetPass(1);
Graphics.DrawMeshNow(screenQuad_, Matrix4x4.identity);

material_.SetTexture("_SmoothnessTexture", yBlurredTexture);
シェーダ
// rgb: specular, a: smoothness
sampler2D _CameraGBufferTexture1;
inline float3 GetSmoothness(float2 uv)
{
    return tex2D(_CameraGBufferTexture1, uv).w;
}
...

float4 frag_composition(v2f i) : SV_Target
{
    float2 uv = i.screenPos.xy / i.screenPos.w;
    float4 base = tex2D(_MainTex, uv);

    float smoothness = GetSmoothness(uv);
    float4 reflection = tex2D(_AccumulationTexture, uv);
    float4 smoothed = tex2D(_SmoothnessTexture, uv);
    reflection = lerp(smoothed, reflection, smoothness);

    float4 a = float4(GetSpecular(uv), 1.0) * reflection.a;
    return lerp(base, reflection, a);
}
おわりに
まだ色々と最適化の余地はあるようなので、引き続き試していこうと思います。