龍神録プログラミングの館(http://dixq.net/rp/)の第54〜56章に掲載されている「画像弾幕」の作成を目標とします.現在作成中の愉繰郷はC++で作った,と*建前上*言えることを目標としているので,お勉強も兼ねてクラスにして見たいと思います.今回は,第54章(http://dixq.net/rp/54.html)『画像→弾幕 変換ツールを作ってみよう .1』の内容を扱います.
とは言うものの,中身は殆どDixqさんと同じコードです.
2値化クラス
LoadBmp.h
#include <string>
#include <boost/numeric/ublas/matrix.hpp>

/*! @brief 各ピクセルの情報を格納 */
typedef struct {
	unsigned char BGR[3];	//!< Blue, Green, Redの順番
} _COLOR_TABLE;

/*! @brief BMPを読み込むクラス */
class CLoadBmp {
private:
	const std::string FileName;	//!< 読み込んだBMPファイル名
	int Width;					//!< BMPの横幅px
	int Height;					//!< BMPの縦幅px
	short Bit;					//!< BMPのビット数

	//! BMPのファイルデータ
	boost::numeric::ublas::matrix<_COLOR_TABLE> ColorTable;

	//! 2値化フラグ BLACK/WHITEを格納
	boost::numeric::ublas::matrix<bool> BitTable;

	/*! @brief ファイルを読み込み各フィールドをセット */
	bool LoadFile();

	/*! @brief 2値化をする */
	void Binarization();

public:
	/*!
	@brief コンストラクタ
	@param[in] fileName 読み込むBMPファイル名
	*/
	CLoadBmp(const char* fileName);

	/*! @brief BMPの横幅pxを得る */
	int GetWidth() const;

	/*! @breif BMPの縦幅pxを得る */
	int GetHeight() const;

	/*! @brief BMPのビット数を得る */
	int GetBit() const;

	/*! @brief BMPをそのまま描画 */
	void Draw() const;

	/*! @brief 2値化したBMPを描画 */
	void DrawBinary() const;
};
将来的に2値化以外にも,種々の色の弾に対応できたら,と思ってメンバ関数BinarizationはLoadFileと分けておきました.
LoadBmp.cpp
#include <DxLib.h>
#include <fstream>
#include "LoadBmp.h"

#define BMP_HEADER_SIZE (54)		// ビットマップのヘッダサイズ
#define BMP_BINARY_OFFSET (128)		// ビットマップ2値化の閾値輝度

using namespace std;

CLoadBmp::CLoadBmp(const char* fileName)
: FileName(fileName), Width(0), Height(0), Bit(0)
{
	// 各フィールドをセット
	if (!LoadFile()) return;

	// 2値化
	Binarization();
}

bool CLoadBmp::LoadFile()
{
	// ファイルの読み込み
	ifstream ifs(FileName.c_str(), ios::in | ios::binary);
	if (ifs.fail()) {
		printfDx("file open error: %s\n", FileName.c_str());
		return false;
	}

	// ファイルサイズのチェック
	size_t fileSize = (size_t)ifs.seekg(0, ios::end).tellg();
	if (fileSize <= BMP_HEADER_SIZE) {
		printfDx("file size error: %s\n", FileName.c_str());
		return false;
	}
	ifs.seekg(0, ios::beg);

	// 横幅
	ifs.seekg(0x0012, ios::beg);
	ifs.read(reinterpret_cast<char*>(&Width), sizeof(int));

	// 縦幅
	ifs.seekg(0x0016, ios::beg);
	ifs.read(reinterpret_cast<char*>(&Height), sizeof(int));

	// ビット数
	ifs.seekg(0x001C, ios::beg);
	ifs.read(reinterpret_cast<char*>(&Bit), sizeof(short));

	// カラー/ビットテーブルのサイズをセット
	ColorTable.resize(Width, Height);
	BitTable.resize(Width, Height);

	// 各ピクセルを読み込み
	ifs.seekg(BMP_HEADER_SIZE, ios::beg);
	for (int j=Height-1; j>=0; j--) {
		for (int i=0; i<Width; i++) {
			for (int k=0; k<3; k++) {
				char* data = reinterpret_cast<char*>(&ColorTable(i,j).BGR[k]);
				ifs.get(*data);
			}
		}
	}

	return true;
}

void CLoadBmp::Binarization()
{
	for (int i=0; i<Width; i++) {
		for (int j=0; j<Height; j++) {
			// 輝度平均を調べる
			int sum = 0;
			for (int k=0; k<3; k++) {
				sum += ColorTable(i,j).BGR[k];
			}
			sum /= 3;

			// 2値化
			BitTable(i,j) = (sum < BMP_BINARY_OFFSET) ? 1 : 0;
		}
	}
}

void CLoadBmp::Draw() const
{
	for (int x=0; x<Width; x++) {
		for (int y=0; y<Height; y++) {
			int Color = GetColor(ColorTable(x,y).BGR[2],ColorTable(x,y).BGR[1],ColorTable(x,y).BGR[0]);
			DrawPixel(x, y, Color);
		}
	}
}

void CLoadBmp::DrawBinary() const
{
	static int
		Black = GetColor(0,0,0),
		White = GetColor(255,255,255);
	DrawBox(0, 0, Width, Height, White, TRUE);
	for (int x=0; x<Width; x++) {
		for (int y=0; y<Height; y++) {
			if (BitTable[x][y]) DrawPixel(x, y, Black);
		}
	}
}

int CLoadBmp::GetWidth() const
{
	return Width;
}

int CLoadBmp::GetHeight() const
{
	return Height;
}

int CLoadBmp::GetBit() const
{
	return Bit;
}
めぼしい変更は,ビットマップの縦横 / ビット数を取得する部分くらいです.
実行
以下のコードをmain.cppとして実行しました.なお,KeyMouse.hは51章(http://dixq.net/rp/51.html)のものをそのまま用いています.
#include <DxLib.h>
#include "LoadBmp.h"
#include "KeyMouse.h"

int WINAPI WinMain(HINSTANCE hInstance, HINSTANCE hPrevInstance, LPSTR lpCmdLine, int nShowCmd)
{
	// BMPの読み込み
	CLoadBmp bmp("bmp/hecomi.bmp");

	// スクリーンサイズ変更
	SetGraphMode(bmp.GetWidth(), bmp.GetHeight(), 16);

	// Windowサイズ変更許可
	SetWindowSizeChangeEnableFlag(TRUE);

	// 初期化&描画スクリーンセット
	if (DxLib_Init() == 1 || SetDrawScreen(DX_SCREEN_BACK) != 0) {
		return -1;
	}

	// ループ
	bool Flag = true;
	int Key[256];
	while (
		ProcessMessage() == 0 &&
		ClearDrawScreen() == 0 &&
		GetHitKeyStateAll_2(Key) == 0 &&
		Key[KEY_INPUT_ESCAPE] == 0
	) {
		// スペースを押すと2値化
		Flag = !(Key[KEY_INPUT_SPACE]);

		if (Flag) {
			bmp.DrawBinary();
		} else {
			bmp.Draw();
		}

		// 反映
		ScreenFlip();
	}

	DxLib_End();
	return 0;
}
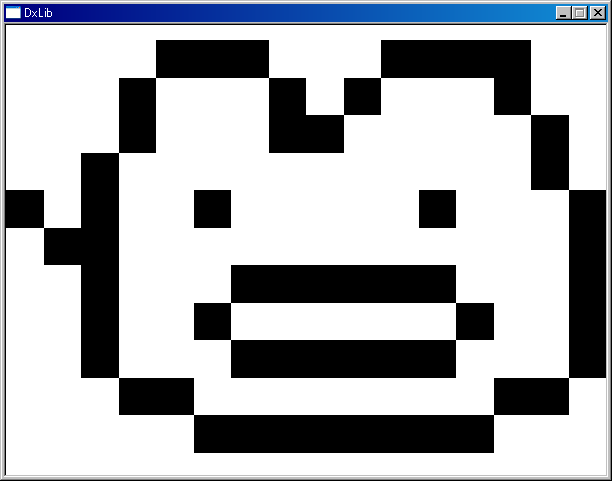
結果
ってかこの画像では2値化の意味殆ど無い気がしますが,上手く動作していますね.
ただ,上手くいかないBMPファイルもありました.原因は今のところ不明で,正直,上手く動くファイルを使えばいいので解決しなくてもいいかなぁ.現在原因解明中です.
参考資料
- ファイルサイズを調べたい(http://d.hatena.ne.jp/Nilfs/20090306/1236317209)
ビットマップ読み込み時のエラー処理部に使わさせていただきました.boost使っても良かったのですが(matrix使ってるし),中身が良く判らないのでヤメておきました.
- ビットマップのフォーマット(http://kuwalab.net/technics/bitmap/index.html)
Dixqさんのページにも書かれておりましたが,ビットマップの中身に関しては,こちらのサイトを参考にさせていただきました.

