はじめに
1年間更新していなかったのですが、先日コメントを頂きまして再開しました。ゲーム用 JS ライブラリを使わずに弾幕シューティング作ってみる企画です。今回が最終回で、弾幕シューティングゲーム一番の醍醐味の弾幕を作ってみる回です。
第1回 〜 第4回まで
解説
敵を表示
まずはボスっぽい敵を表示します。
// 動き方を関数で指定できる敵
var EnemyMovedByVelocityFunc = function(func, enemy) {
    Enemy.call(this, enemy);
    this.func = func;
};
EnemyMovedByVelocityFunc.prototype = $.extend({}, Enemy.prototype, {
    move : function() {
        var vec = this.func(this.cnt);
        this.vx = vec.vx;
        this.vy = vec.vy;
        Enemy.prototype.move.call(this);
    }
});

// ☆弾幕を出すボス
var KochiyaSanae = function(func, enemy) {
    EnemyMovedByVelocityFunc.call(this, func, enemy);
};
KochiyaSanae.prototype = $.extend({}, EnemyMovedByVelocityFunc.prototype, {
    move : function() {
        EnemyMovedByVelocityFunc.prototype.move.call(this);
    },
    shot : function() {
        // この中で☆弾幕を作成
    }
});
これを main から呼びます。
if (frame === 0) {
    Enemies.add(
        new KochiyaSanae(function(cnt) {
            return {
                vx : 0,
                vy : Math.sin(Math.PI * cnt / 60)
            };
        }, {
            x   : WIDTH / 2,
            y   : HEIGHT / 4,
            hp  : 100000,
            key : 'enemy.big'
        })
    );
}
画像は以下になります。
Materials.add({
    key    : 'enemy.big',
    path   : 'img/enemy/big.png',
    width  : 64,
    height : 64,
    cd     : 20
});
これで上下にゆらゆらする敵が出来ます。
☆を描く
次に五芒星を描いてみます。色々な描き方があると思いますが、頂点の座標間のベクトルに注目した描き方で実装してみます。

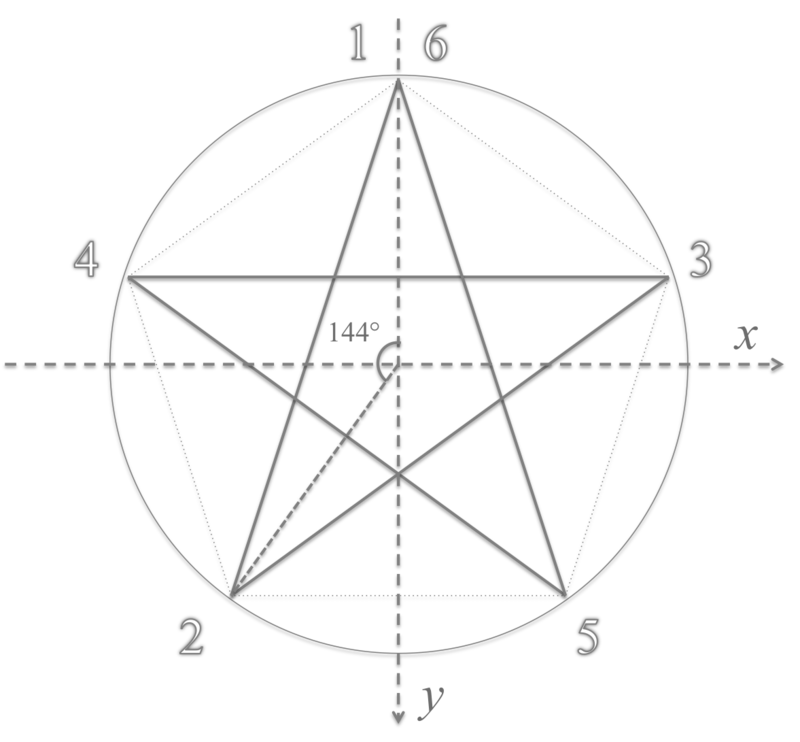
五芒星は正五角形の各頂点を結んだ形になっており、弾幕としては図の番号の 1→2→...→6と描く形になって欲しいです。そこで以下のように、各頂点から次の頂点へのベクトル群を作成します。
// 初期化
var BC_Star = function(bc) {
    BulletCurtain.call(this);
    this.num      = 100;  // 総弾数
    this.distance = 6;    // 弾と弾の間の距離
    this.key      = 'bullet.normal';
    this.bullets  = [];   // この弾幕で管理する弾

    // (x, y) は弾幕をプロットする位置
    this.x = bc.x;
    this.y = bc.y - this.distance * (this.num/4.2);
}

// 五芒星の各頂点から次の頂点へのベクトル
BC_Star.VECTORS = (function() {
    // 五角形の頂点の角度
    var angles = [];
    for (var i = 0; i < 6; ++i) {
        angles.push((-90 - 144*i)%360);
    }
    // 五角形の頂点の座標
    var points = angles.map(function(ang) {
        return {
            x: Math.cos(Math.PI * ang / 180),
            y: Math.sin(Math.PI * ang / 180)
        };
    });
    // ☆の各頂点から次の頂点へのベクトル(非正規化)
    var vectors = [];
    for (var i = 0; i < points.length - 1; ++i) {
        vectors[i] = {
            x: points[i+1].x - points[i].x,
            y: points[i+1].y - points[i].y
        };
    }
    return vectors;
})();
そしてこれを以下のようなコードで動かします。
BC_Star.prototype = {
    move : function() {
        if (this.cnt < this.num)  {
            for (var i = 0; i <= this.num; ++i) {
                if (this.cnt === i) {
                    var bullet = new Bullet({
                        x     : this.x,
                        y     : this.y,
                        key   : this.key,
                        color : 'color' in this ? this.color : COLOR.RED
                    });
                    this.bullets.push(bullet);
                    Bullets.add(bullet);

                    // ここで次のプロット位置を決定
                    var direction = Math.floor(i/this.num * 5) % 5;
                    var vector = {
                        x : BC_Star.VECTORS[direction].x,
                        y : BC_Star.VECTORS[direction].y
                    };
                    this.x += this.distance * vector.x;
                    this.y += this.distance * vector.y;
                    break;
                }
            }
        } else {
            this.flag = false;
        }
        ++this.cnt;
    }
};
☆を動かす
動かし方も色々あると思いますが、今回は弾の状態に注目してみます。弾としては、
- 止まっている
- 中心部から広がる
- ぐにゃっと動く
の3状態があります。そこで状態に応じて速度を変更できるような弾を作ってみます。
var StatefulBullet = function(bullet, velocities) {
    this.velocities = velocities;
    this.state      = 0;
    Mover.call(this, bullet);
};
StatefulBullet.prototype = $.extend({}, Bullet.prototype, {
    move : function() {
        if (this.state in this.velocities) {
            var v = this.velocities[this.state](this);
            this.vx = v.x;
            this.vy = v.y;
        }
        Bullet.prototype.move.call(this);
    }
});
で、この弾を利用する形に書き換えます。
var BC_Star = function(bc) {
    BulletCurtain.call(this);
    this.num      = 100;
    this.distance = 6;
    this.key      = 'bullet.normal';
    this.bullets  = [];
    this.angle    = ('angle'  in bc) ? bc.angle  : Math.PI * (-90 / 180);
    this.color    = ('color'  in bc) ? bc.color  : COLOR.RED;
    this.parent   = ('parent' in bc) ? bc.parent : null;

    this.x = bc.x;
    this.y = bc.y - this.distance * (this.num/4.2);

    // 状態に応じた弾の動きのバリエーション
    var self = this;
    this.state_velocities = [
        function() {
            return {
                x: 0,
                y: 0
            };
        },
        function() {
            return {
                x: self.distance * Math.cos(self.angle),
                y: self.distance * Math.sin(self.angle)
            };
        },
        function(bullet) {
            var angle = bullet.getAngle(self.parent)*5;
            return {
                x: Math.cos(angle),
                y: Math.sin(angle)
            };
        }
    ];
};

BC_Star.prototype = {
    move : function() {
        if (this.cnt < this.num)  {
            for (var i = 0; i <= this.num; ++i) {
                if (this.cnt === i) {
                    // 状態を保持できる弾に書き換える
                    var bullet = new StatefulBullet({
                        x     : this.x,
                        y     : this.y,
                        key   : this.key,
                        color : 'color' in this ? this.color : COLOR.RED,
                        state : 0
                    }, this.state_velocities);
                    this.bullets.push(bullet);
                    Bullets.add(bullet);

                    var direction = Math.floor(i/this.num * 5) % 5;
                    var vector = {
                        x : BC_Star.VECTORS[direction].x,
                        y : BC_Star.VECTORS[direction].y
                    };
                    this.x += this.distance * vector.x;
                    this.y += this.distance * vector.y;
                    break;
                }
            }
        }
        //  カウントに応じて各状態を設定
        else if (this.cnt === this.num + 10) {
            this.bullets.forEach(function(bullet) {
                bullet.state = 1;
            });
        }
        else if (this.cnt === this.num + 10 + 32) {
            this.bullets.forEach(function(bullet) {
                bullet.state = 0;
            });
        }
        else if (this.cnt === this.num + 10 + 32 + 30) {
            this.bullets.forEach(function(bullet) {
                bullet.state = 2;
            });
        }
        else if (this.cnt === this.num + 10 + 32 + 30 + 1) {
            this.bullets.forEach(function(bullet) {
                bullet.state = null;
            });
            this.flag = false;
        }
        ++this.cnt;
    },
    draw : function() {}
};
角度が取れるように Mover に getAngle を追加しておきます。
Mover.prototype = {
	...(略),
	getAngle : function(mover) {
		var dx = mover.x - this.x;
		var dy = mover.y - this.y;
		return Math.atan(dx/dy);
	}
};
これで以下のように動くようになります。
これで完成となります!
高速化について
動かしてみるとわかりますが、かなり重いです。プロファイル見てみると jCanvas の drawImage が一番がかかっているので、現状のように各 Mover が draw コールするような設計は抜本的に見なおす必要がありそうです。。
おわりに
ライブラリを使わずにやってきましたが(jQuery とか使ってますが...)、実際は tmlib.js や enchant.js といったゲーム用のライブラリを利用して作成したほうが圧倒的に楽な上に、様々な表現も可能です。また高速化の観点でもライブラリを利用したほうが有利と思われます。ただ、使わずに作るのはそれはそれで面白いところもあるので、興味のある方は是非チャレンジしてみて下さい。


