はじめに
Unity と Arduino を連携させて色々なセンサやアクチュエータを扱うことができるようになると、センサの値のビジュアライズだけに留まらず、3D モデルやゲームと連動した動きが色々と簡単に実現できるようになったり、逆にゲームの中に連動したことを実際の世界で簡単に表現したり出来ます。そこで、Unity と Arduino をつなげる方法として、無料で出来る System.IO.Ports.SerialPort を使った方法と、有料ですが簡単に Arduino と接続できるアセットの Uniduino、2つについて調べてみましたのでご紹介します。
環境
- Mac OS X 10.9.4
- Unity 4.5.2f1
SerialPort から自前で読み取る(無料)
Player Settings から API Compatibility Level を .NET 2.0 Subset から .NET 2.0 へと変更すると、System.IO.Ports.SerialPort クラスが扱えるようになります。

SerialPort クラスには様々なメンバやイベントが用意されており、例えば DataReceived イベントを利用するとシリアル通信でやってきたメッセージを受け取ることが出来ます。
SerialPort port = new SerialPort("COM1", 9600, Parity.None, 8, StopBits.One);
port.DataReceived += new SerialDataReceivedEventHandler(OnDataReceived);
port.Open();
しかしながら、Unity では DataReceived イベントをはじめとする幾つかのメンバ関数が動作せず、利用することが出来ません。
ただし SerialPort.Read() を Update() 内で呼んでメッセージを読み取ることは出来るようです。ただ、これは重い処理なので、Update() やコルーチンで使うと Unity のフレームレートが低下してしまう点や、そもそも 60 fps でしかシリアルからのメッセージを読み取れない(センサはもっと高速)といった問題点が生じます。そこで、スレッドを切って、そちらで値を読み取ってやることが必要になります。
前置きが長くなりましたが、コードを見て行きましょう。ここでは加速度センサの KXR94-2050 で姿勢情報を取得(読み取り)と L チカ(書き込み)をするコードになっています。回路の詳細は下記サイト様を参考にしたのでそちらをご参照ください。
デモ
Test.ino
Arduino 側に焼くスケッチです。加速度センサの値から角度を計算、また LED の ON/OFF を切り替えられるようになっています。
追記(2015/10/29)
参考サイトの回路図とはピン番号が異なりますのでご注意下さい。
namespace {
  const int AVERAGE_NUM = 10;
  const int BASE_X      = 530;
  const int BASE_Y      = 519;
  const int BASE_Z      = 545;
}

void setup()
{
  Serial.begin(9600);
  pinMode(13, OUTPUT);
}

void readAccelerometer()
{
  int x = 0, y = 0, z = 0;
  for (int i = 0; i < AVERAGE_NUM; ++i) {
    x += analogRead(0);
    y += analogRead(1);
    z += analogRead(2);
  }
  x /= AVERAGE_NUM;
  y /= AVERAGE_NUM;
  z /= AVERAGE_NUM;

  const int angleX = atan2(x - BASE_X, z - BASE_Z) / PI * 180;
  const int angleY = atan2(y - BASE_Y, z - BASE_Z) / PI * 180;

  Serial.print(angleX);
  Serial.print("\t");
  Serial.print(angleY);
  Serial.println("");
}

void setLed()
{
  if ( Serial.available() ) {
    char mode = Serial.read();
    switch (mode) {
      case '0' : digitalWrite(13, LOW);  break;
      case '1' : digitalWrite(13, HIGH); break;
    }
  }
}

void loop()
{
  readAccelerometer();
  setLed();
}
SerialHandler.cs
Unity 側でシリアル通信でやってきたメッセージを読み取ったり、書き込んだりする部分です。デリゲートでシリアル通信の受信部を別の場所で処理できるようになっています。
追記(2015/10/29)
67 行目の BytesToRead は Windows ではエラーになるようなのです。コメントアウトしても問題ありませんので下記リンクのコードをご参照下さい。
using UnityEngine;
using System.Collections;
using System.IO.Ports;
using System.Threading;

public class SerialHandler : MonoBehaviour
{
    public delegate void SerialDataReceivedEventHandler(string message);
    public event SerialDataReceivedEventHandler OnDataReceived;

    public string portName = "/dev/tty.usbmodem1421";
    public int baudRate    = 9600;

    private SerialPort serialPort_;
    private Thread thread_;
    private bool isRunning_ = false;

    private string message_;
    private bool isNewMessageReceived_ = false;

    void Awake()
    {
        Open();
    }

    void Update()
    {
        if (isNewMessageReceived_) {
            OnDataReceived(message_);
        }
    }

    void OnDestroy()
    {
        Close();
    }

    private void Open()
    {
        serialPort_ = new SerialPort(portName, baudRate, Parity.None, 8, StopBits.One);
        serialPort_.Open();

        isRunning_ = true;

        thread_ = new Thread(Read);
        thread_.Start();
    }

    private void Close()
    {
        isRunning_ = false;

        if (thread_ != null && thread_.IsAlive) {
            thread_.Join();
        }

        if (serialPort_ != null && serialPort_.IsOpen) {
            serialPort_.Close();
            serialPort_.Dispose();
        }
    }

    private void Read()
    {
        while (isRunning_ && serialPort_ != null && serialPort_.IsOpen) {
            try {
                if (serialPort_.BytesToRead > 0) {
                    message_ = serialPort_.ReadLine();
                    isNewMessageReceived_ = true;
                }
            } catch (System.Exception e) {
                Debug.LogWarning(e.Message);
            }
        }
    }

    public void Write(string message)
    {
        try {
            serialPort_.Write(message);
        } catch (System.Exception e) {
            Debug.LogWarning(e.Message);
        }
    }
}
RotateByAccelerometer.cs
シリアル通信で読み込んだ加速センサの値を利用してオブジェクトを回転するコードです。
using UnityEngine;
using System.Collections;
using System.Collections.Generic;

public class RotateByAccelerometer : MonoBehaviour
{
    public SerialHandler serialHandler;

    private List<Vector3> angleCache = new List<Vector3>();
    public int angleCacheNum = 10;
    public Vector3 angle {
        private set {
            angleCache.Add(value);
            if (angleCache.Count > angleCacheNum) {
                angleCache.RemoveAt(0);
            }
        }
        get {
            if (angleCache.Count > 0) {
                var sum = Vector3.zero;
                angleCache.ForEach(angle => { sum += angle; });
                return sum / angleCache.Count;
            } else {
                return Vector3.zero;
            }
        }
    }

    void Start()
    {
        serialHandler.OnDataReceived += OnDataReceived;
    }

    void Update()
    {
        transform.rotation = Quaternion.Euler(angle);
    }

    void OnDataReceived(string message)
    {
        var data = message.Split(
                new string[]{"\t"}, System.StringSplitOptions.None);
        if (data.Length < 2) return;

        try {
            var angleX = float.Parse(data[0]);
            var angleY = float.Parse(data[1]);
            angle = new Vector3(angleX, 0, angleY);
        } catch (System.Exception e) {
            Debug.LogWarning(e.Message);
        }
    }
}
LedController.cs
Unity から Arduino 側にメッセージを送って LED の ON/OFF を制御するコードです。
using UnityEngine;
using System.Collections;

public class LedController : MonoBehaviour
{
    public SerialHandler serialHandler;

    void Update()
    {
        if ( Input.GetKeyDown(KeyCode.A) ) {
            serialHandler.Write("0");
        }
        if ( Input.GetKeyDown(KeyCode.S) ) {
            serialHandler.Write("1");
        }
    }
}
上記コードをひな形として色々と改造すればだいたいのことが出来ると思います。
Uniduino を利用(有料)
Uniduino は Unity から Arduino を Arduino 言語ライクに扱うことの出来る有料のアセット($30)です。
- Uniduino 参考ページ
既に先人の方々がブログで解説されていますので、概念だけ簡単に紹介します。
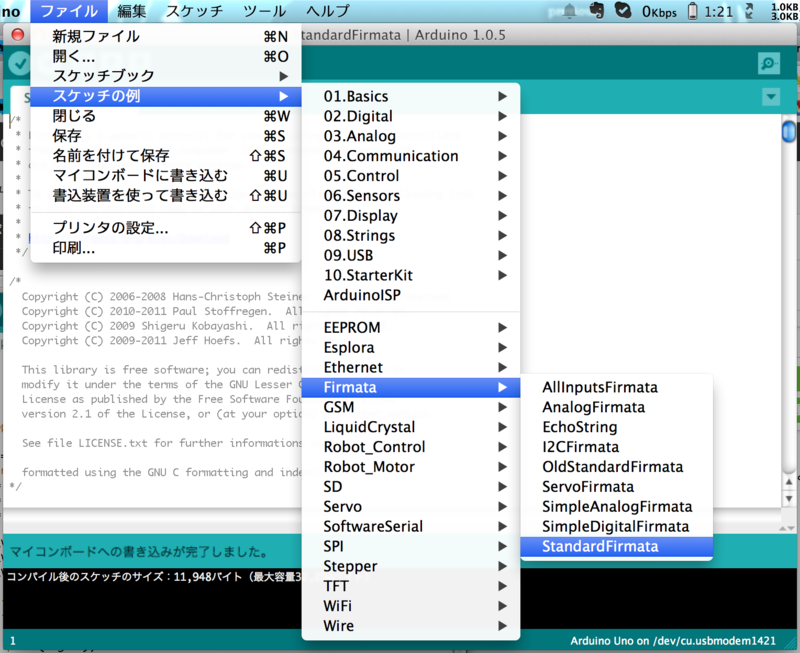
Arduino へは Firmata(ふぁるまーた)という PC と Arduino 間で色々とやり取りできるプロトコルを実装したファームウェアを焼きます。これは Arduino のスケッチに予め用意されています。

Firmata を通じた Arduino とのやり取りに関しては、Processing(Java)や oF(C++)をはじめ、Ruby や Node.js まで様々な言語の実装があります。
- Firmata 参考ページ
これを利用して、ピンの設定なども含めて PC 側の実装のみで簡単にアクチュエータの制御やセンサの値の取得が可能です。具体的にコードを見てみます。
BlinkyLight.cs
using UnityEngine;
using System.Collections;
using Uniduino;

public class BlinkyLight : MonoBehaviour
{
    private Arduino arduino_;

    void Start()
    {
        // Arduino クラスのインスタンスを取得
        arduino_ = Arduino.global;

        // Arduino の設定
        arduino_.Setup(ConfigurePins);

        // コルーチンで定期的な処理を行う
        StartCoroutine(BlinkLoop());
    }

    void ConfigurePins()
    {
        // 13 番 pin を OUTPUT に設定
        arduino_.pinMode(13, PinMode.OUTPUT);
    }

    IEnumerator BlinkLoop()
    {
        // 1 秒ごとに HIGH / LOW を切り変える
        while (true) {
            arduino_.digitalWrite(13, Arduino.HIGH);
            yield return new WaitForSeconds(1);
            arduino_.digitalWrite(13, Arduino.LOW);
            yield return new WaitForSeconds(1);
        }
    }
}
デモ
Arduino クラスを通じて色々な API を叩くことで、Arduino のスケッチで書くようなコード(setup と loop)を Unity 側で書けるような形になっています(簡単)。「Uniduino > Prefabs > Uniduino」Prefab をシーンに配置して実行すれば、シリアルポートや Baud Rate などは自動的に設定されて、動画のように Arduino と連携できます。
センサの値の読み込みは以下のようになります。Uniduino を使わないで書いたコードと同じで、加速度センサから得た姿勢情報を利用してオブジェクトを回転するコードになっています。
Accelerometer.cs
using UnityEngine;
using System.Collections;
using System.Collections.Generic;
using Uniduino;

public class Accelerometer : MonoBehaviour
{
    private Arduino arduino_;
    public Transform target;
    public Vector3 baseValues = Vector3.zero;
    public int rotationCacheNum_ = 10;

    private List<Vector3> rotationCache_ = new List<Vector3>();

    public Vector3 rotation {
        get {
            var sum = Vector3.zero;
            rotationCache_.ForEach(val => { sum += val; });
            return sum / rotationCache_.Count;
        }
    }

    void Start()
    {
        arduino_ = Arduino.global;
        arduino_.Setup(ConfigurePins);
    }

    void Update()
    {
        AddRotationCache(new Vector3(
            arduino_.analogRead(0),
            arduino_.analogRead(1),
            arduino_.analogRead(2)
        ));

        if (target) {
            target.rotation = Quaternion.Euler(rotation);
        }
    }

    void AddRotationCache(Vector3 pinValues)
    {
        var diff = pinValues - baseValues;
        rotationCache_.Add(new Vector3(
            Mathf.Atan2(diff.x, diff.z) / Mathf.PI * 180,
            0,
            Mathf.Atan2(diff.y, diff.z) / Mathf.PI * 180
        ));
        if (rotationCache_.Count > rotationCacheNum_) {
            rotationCache_.RemoveAt(0);
        }
    }

    void ConfigurePins()
    {
        SetAnalog(0);
        SetAnalog(1);
        SetAnalog(2);
    }

    void SetAnalog(int pin)
    {
        arduino_.pinMode(pin, PinMode.ANALOG);
        arduino_.reportAnalog(pin, 1);
    }
}
デモ
また、詳細は割愛しますが、Playmaker 用のカスタムアクションも用意してあるので、コード書かずにビジュアルプログラミングだけで色々なことも出来そうです。
おわりに
予算があり且つセンサの値の取得や単純な書き込み程度であれば断然 Uniduino を使ったほうが楽だと思います。予算がない場合や、ちょっとなにかやりたい時、Arduino 側のライブラリを利用したい時は自前でやった方が良いと思います。これでハードウェアと連動したプロトタイプやイベント用デモも簡単に作れそうです。