はじめに
本記事はボリュームレンダリングシリーズで以下の記事の続きです。
今回はボリュームレンダリングの結果に色付けしたりシェーディングしたりするところをやります。
参考
以下のエントリを参考にしています。
ダウンロード
今回は 5、6 が範囲になります。
色付け
ボリュームレンダリングのデータは 0 ~ 1 で密度を表すように変換していました(0 が疎で 1 が密)。この密度に対応するように色テーブルを作成してレイの各サンプリング地点での結果に色付けをしてあげればカラフルな結果が実現できます。
そこで次のように Gradient を使ってこの色テーブルを作成しマテリアルにセットするコンポーネントを作成します。
using UnityEngine;

[ExecuteInEditMode]
public class VolumeRenderingWithTransferFunction : MonoBehaviour
{
    const int width = 100;

    [SerializeField]
    Gradient gradient;

#if UNITY_EDITOR
    [SerializeField]
    bool updateTextureInEveryFrame = false;
#endif

    Texture2D texture_;

    void Start()
    {
        UpdateTexture();
    }

    void Update()
    {
#if UNITY_EDITOR
        if (updateTextureInEveryFrame)
        {
            UpdateTexture();
        }
#endif
    }

    void UpdateTexture()
    {
        texture_ = new Texture2D(width, 1, TextureFormat.ARGB32, false);
        for (int i = 0; i < width; ++i)
        {
            var t = (float)i / width;
            texture_.SetPixel(i, 0, gradient.Evaluate(t));
        }
        texture_.Apply(false);
        var renderer = GetComponent<Renderer>();
        renderer.sharedMaterial.SetTexture("_Transfer", texture_);
    }
}
Gradient を使うと Unity が予め用意してくれている RGB / アルファをセットできる UI が出てきます。これを次のようにセットしてみます。

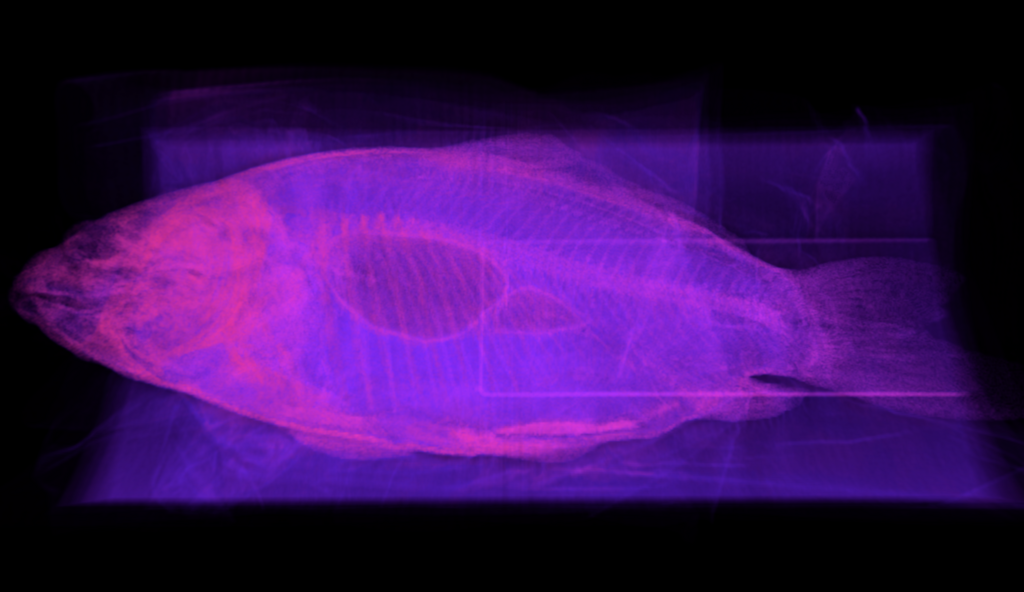
これは密度の薄い場所(= 何もない場所)は透明、中位の場所(= 魚の身の部分など)は紫色で半透明、濃い場所(= 骨など)はピンクで不透明という意味です。これを使うようにシェーダを次のように書き換えます。
Shader "VolumeRendering/VolumeRendering3"
{

Properties
{
    [Header(Rendering)]
    ...
    _Transfer("Transfer", 2D) = "" {}
    ...
}

CGINCLUDE

...
sampler2D _Transfer;
...

inline fixed4 transferFunction(float t)
{
    return tex2D(_Transfer, float2(t, 0));
}

...

fixed4 frag(v2f i) : SV_Target
{
    ...
    for (int i = 0; i < _Iteration; ++i)
    {
        fixed volume = sampleVolume(localPos + 0.5);
        float4 color = transferFunction(volume) * volume;
        output += (1.0 - output.a) * color * _Intensity;
        ...
    }

    return output;
}

ENDCG

...

}
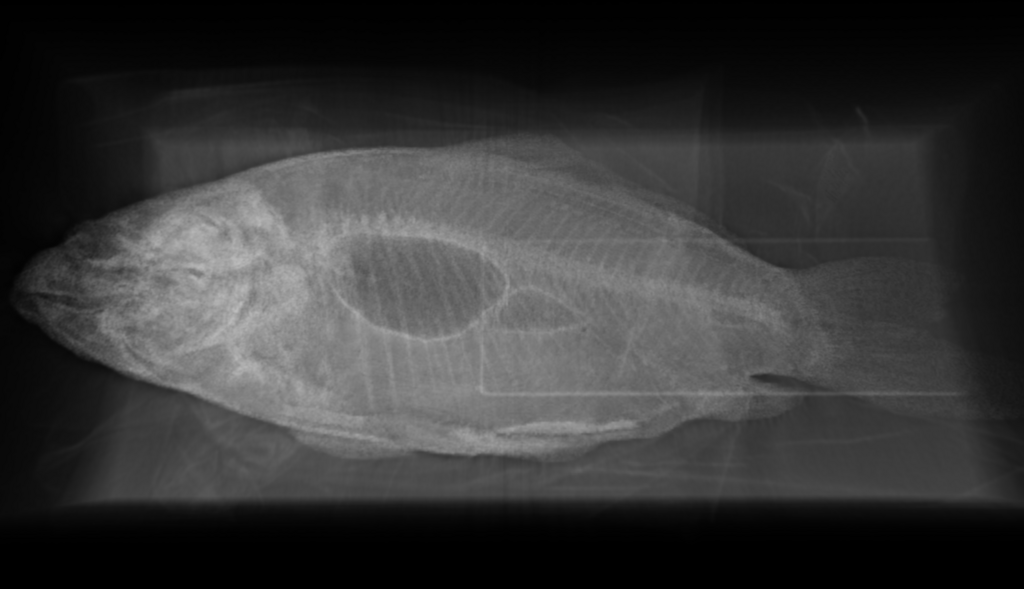
レイの各到達地点の volume(0 ~ 1)を transfureFunction() というテーブルから色をサンプリングしてくる関数に渡して得られた RGBA の color を求め、それに volume を掛けたものを色とします。これで次のような結果になります。
前回の結果
今回の結果
動画

色がかかりました。骨がきれいに映るようテーブルをこまめに調整する必要はありますが、白黒よりも面白い見た目になると思います。
シェーディング
法線の計算
次は色付けだけでなく陰影付もしてみましょう。陰影はボリュームの粗密の三次元勾配から法線を求めることで可能になります。次のようにインポータを改造して勾配を求めてみます。
using UnityEngine;
using UnityEditor;
using UnityEditor.Experimental.AssetImporters;
using System;
using System.IO;

[ScriptedImporter(1, "raw")]
public class PvmRawImporter2 : ScriptedImporter
{
    public enum Bits
    {
        Eight = 1,
        Sixteen = 2,
    }

    public int width = 256;
    public int height = 256;
    public int depth = 256;
    public Bits bit = Bits.Eight;
    public int smooth = 3;

    int valueCount
    {
        get { return width * height * depth; }
    }

    int totalSize
    {
        get { return valueCount * (int)bit; }
    }

    int maxValueSize
    {
        get
        {
            switch (bit)
            {
                case Bits.Eight   : return (int)Byte.MaxValue;
                case Bits.Sixteen : return (int)UInt16.MaxValue;
                default:
                    throw new Exception("bit is wrong.");
            }
        }
    }

    void ReadVolumeData(string path, Color[] colors)
    {
        using (var stream = new FileStream(path, FileMode.Open))
        {
            if (stream.Length != totalSize)
            {
                throw new Exception("Data size is wrong.");
            }

            float a = 1f / maxValueSize;
            var buf = new byte[(int)bit];

            for (int i = 0; i < colors.Length; ++i)
            {
                float value = 0f;
                switch (bit)
                {
                    case Bits.Eight:
                        var b = stream.ReadByte();
                        value = a * b;
                        break;
                    case Bits.Sixteen:
                        stream.Read(buf, 0, 2);
                        value = a * BitConverter.ToUInt16(buf, 0);
                        break;
                }
                colors[i].a = value;
            }
        }
    }

    float SampleVolume(Color[] colors, int x, int y, int z)
    {
        if (x < 0) x = 0;
        if (y < 0) y = 0;
        if (z < 0) z = 0;
        if (x >= width)  x = width  - 1;
        if (y >= height) y = height - 1;
        if (z >= depth)  z = depth  - 1;
        var index = (z * width * height) + (y * width) + x;
        return colors[index].a;
    }

    Vector3 CalcSmoothedGradient(Vector3[] grads, int x0, int y0, int z0)
    {
        var sum = Vector3.zero;
        int n = smooth;

        for (int z = z0 - n; z <= z0 + n; ++z)
        {
            if (z < 0 || z >= depth) continue;
            for (int y = y0 - n; y <= y0 + n; ++y)
            {
                if (y < 0 || y >= height) continue;
                for (int x = x0 - n; x <= x0 + n; ++x)
                {
                    if (x < 0 || x >= width) continue;
                    var index = (z * width * height) + (y * width) + x;
                    sum += grads[index];
                }
            }
        }

        return sum.normalized;
    }

    void CalcGradients(Color[] colors)
    {
        var grads = new Vector3[colors.Length];

        for (int z = 0; z < depth; ++z)
        {
            for (int y = 0; y < height; ++y)
            {
                for (int x = 0; x < width; ++x)
                {
                    var grad = new Vector3(
                        SampleVolume(colors, x - 1, y, z) - SampleVolume(colors, x, y, z),
                        SampleVolume(colors, x, y - 1, z) - SampleVolume(colors, x, y, z),
                        SampleVolume(colors, x, y, z - 1) - SampleVolume(colors, x, y, z));
                    var index = (z * width * height) + (y * width) + x;
                    grads[index] = grad;
                }
            }
        }

        for (int z = 0; z < depth; ++z)
        {
            for (int y = 0; y < height; ++y)
            {
                for (int x = 0; x < width; ++x)
                {
                    var grad = CalcSmoothedGradient(grads, x, y, z);
                    var index = (z * width * height) + (y * width) + x;
                    colors[index].r = (1f + grad.x) * 0.5f;
                    colors[index].g = (1f + grad.y) * 0.5f;
                    colors[index].b = (1f + grad.z) * 0.5f;
                }
            }
        }
    }

    Texture3D GetTexture3D(string path)
    {
        var colors = new Color[valueCount];

        ReadVolumeData(path, colors);
        CalcGradients(colors);

        var tex3d = new Texture3D(width, height, depth, TextureFormat.RGBA32, false);
        tex3d.SetPixels(colors, 0);
        tex3d.Apply();

        return tex3d;
    }

    public override void OnImportAsset(AssetImportContext ctx)
    {
        try
        {
            var tex3d = GetTexture3D(ctx.assetPath);
            ctx.AddObjectToAsset("Volume", tex3d);
        }
        catch (Exception e)
        {
            Debug.LogException(e);
        }
    }
}
ちょっと長くなってしまいました...、重要なところを解説します。まず、RAW データをインポートすると OnImportAsset() が走ります。ReadVolumeData() 内では RAW データを読み出し、その結果を Color のアルファに書き込み配列として格納します。次に CalcGradients() では、このアルファの XYZ それぞれの前後の差分をとって Vector3 の配列として格納した後、インスペクタ上から与えられた前後の数(smooth)分で平均を取って均し、Vector3.normalized で正規化します。これが法線となるのですが、色で格納する関係上法線の各 XYZ 成分の範囲である [-1, 1] の値を [0, 1] にするために (1 + x) * 0.5 とエンコードして Color の RGB 成分へ書き込んでいます。
ちなみに、256 x 256 x 512 のデータを smooth = 2 などで変換すると数分時間がかかりました。変換中は気長にお待ち下さい。
法線の確認
このデータを使ってレンダリングするようシェーダを書き換えます。次のようにアルファチャネルだけでなく RGBA をサンプリングするようにし、RGB に格納された法線データをデコード(2 * x - 1)します。まずは試しに法線が正常に計算できてるか確認してみます。
...

inline fixed4 sampleVolume(float3 pos)
{
    ...
    return tex3D(_Volume, pos) * (x * y * z);
}

...

fixed4 frag(v2f i) : SV_Target
{
    ...
    for (int i = 0; i < _Iteration; ++i)
    {
        fixed4 volume = sampleVolume(localPos + 0.5);
        fixed a = volume.a;
        fixed3 normal = 2.0 * volume.rgb - 1.0;
        fixed4 color = transferFunction(a) * a * _Intensity;
        color.rgb = color.a * normal;
        output += (1.0 - output.a) * color;
        ...
    }
    ...
}

...
RGB を計算した法線で上書きしています。見やすいように _Intensity は 1.0 に引き上げておきましょう。これで結果を見てみると次のように正常に法線が出力できているのが確認できると思います。

X 方向っぽい腹の部分は赤、Z 方向の口元は青、Y 方向の動体上部は緑となっています。ちなみにデコードしないでそのまま volume.rgb を書き出すと次のようになります。

シェーディング
では次にこの法線情報を使ってシェーディングをしてみます。ライトの情報を拾ってくるために Pass の Tags で LightMode を ForwardBase にし、_WorldSpaceLightPos0 を使ってディレクショナルライトの方向を引っ張ってきます。これをローカル空間の向きにして次のように diffuse を計算します。
...

fixed4 frag(v2f i) : SV_Target
{
    ...
    float3 lightDir = normalize(mul(unity_WorldToObject, _WorldSpaceLightPos0));
    ...
    for (int i = 0; i < _Iteration; ++i)
    {
        fixed4 volume = sampleVolume(localPos + 0.5);
        fixed a = volume.a;
        fixed3 normal = 2.0 * volume.rgb - 1.0;
        fixed shadow = dot(lightDir, -normal);
        fixed4 color = transferFunction(a) * a * _Intensity;
        color.rgb = color.a * shadow;
        output += (1.0 - output.a) * color;
        ...
    }
    ...
}

ENDCG

SubShader
{
...

Pass
{
    Tags { "LightMode" = "ForwardBase" }
    ...
}

}

}
結果は以下のようになります。
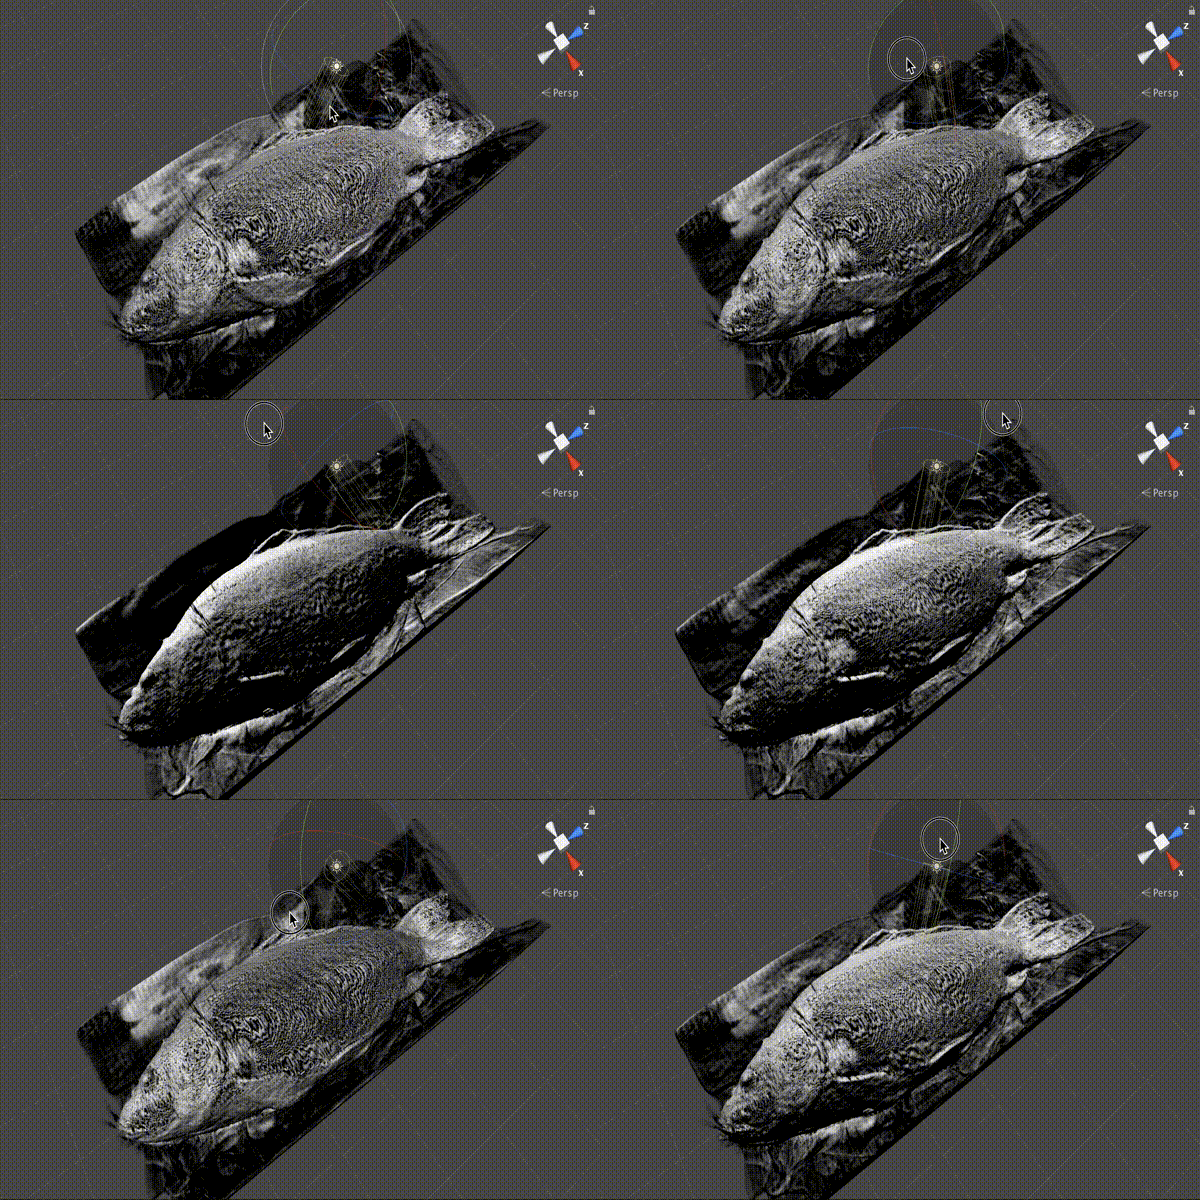
カラーに影付け
最後に先ほど色付けしたとシェーディングを合わせてみましょう。
...
Properties
{
    ...
    _Ambient("Ambient", Range(0.0, 1.0)) = 0.1
    _Shadow("Shadow", Range(0.0, 5.0)) = 2.0
    ...
}

...
float _Ambient;
float _Shadow;
...

fixed4 frag(v2f i) : SV_Target
{
    ...
    for (int i = 0; i < _Iteration; ++i)
    {
        fixed4 volume = sampleVolume(localPos + 0.5);
        fixed a = volume.a;
        fixed3 normal = 2.0 * volume.rgb - 1.0;
        fixed shadow = dot(lightDir, -normal);
        fixed4 color = transferFunction(a) * a * _Intensity;
        color.rgb *= _Ambient + (1.0 - shadow * _Shadow);
        output += (1.0 - output.a) * color;
        ...
    }

    return output;
}
色を持ち上げる _Ambient と影の強さを指定する _Shadow をパラメタとして追加しています。transferFunction() で取ってきた色の RGB 成分にこれらを使って求めた影の強さを掛けて出力しています。結果は以下のようになります。
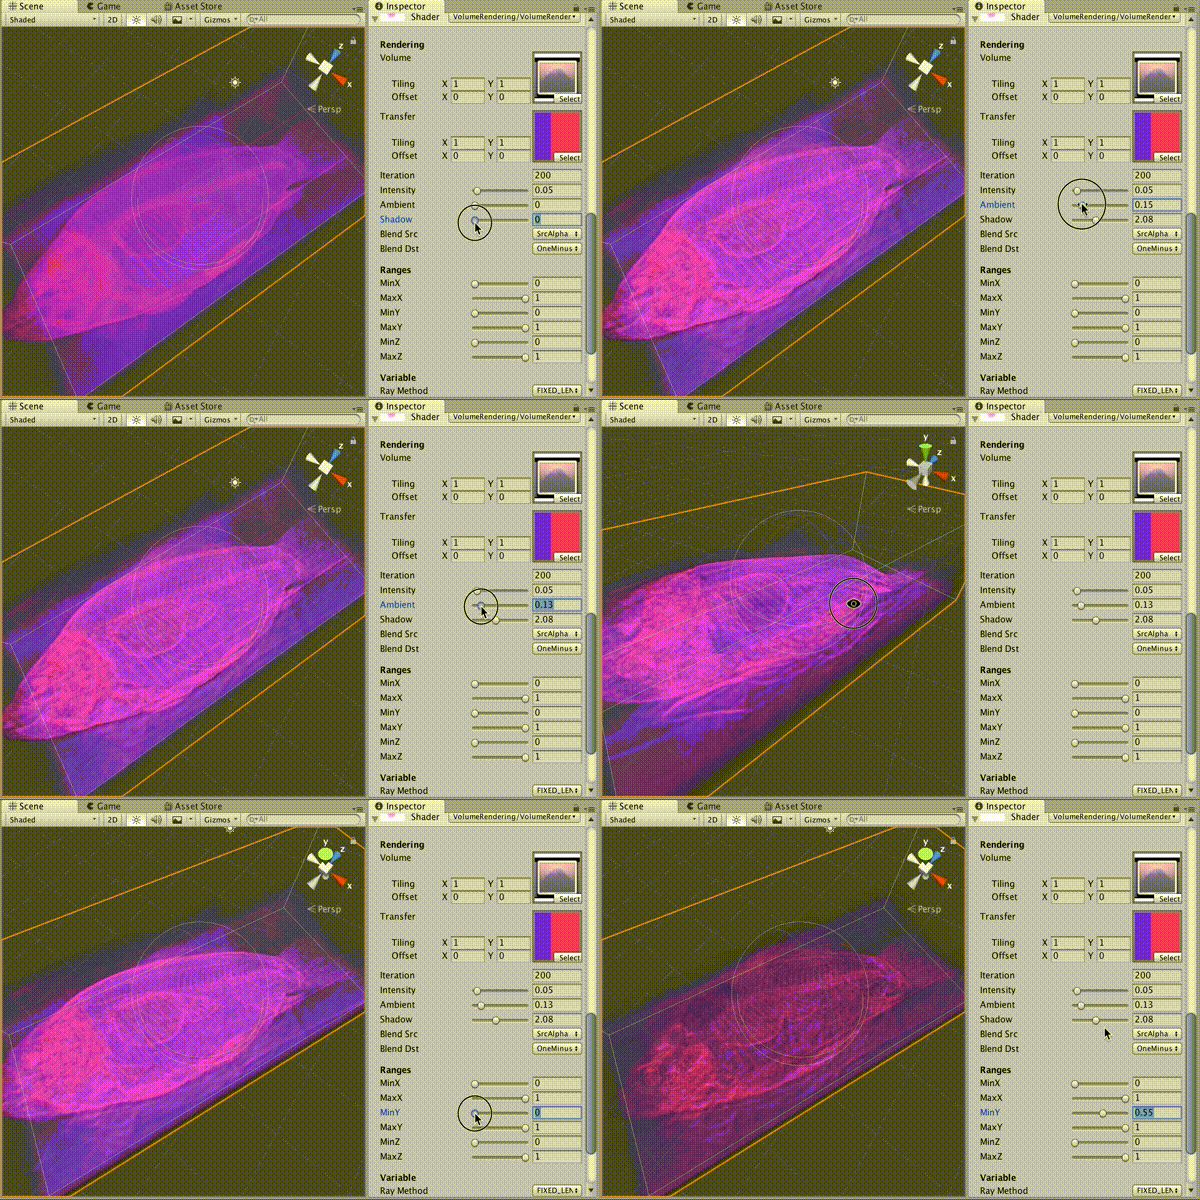
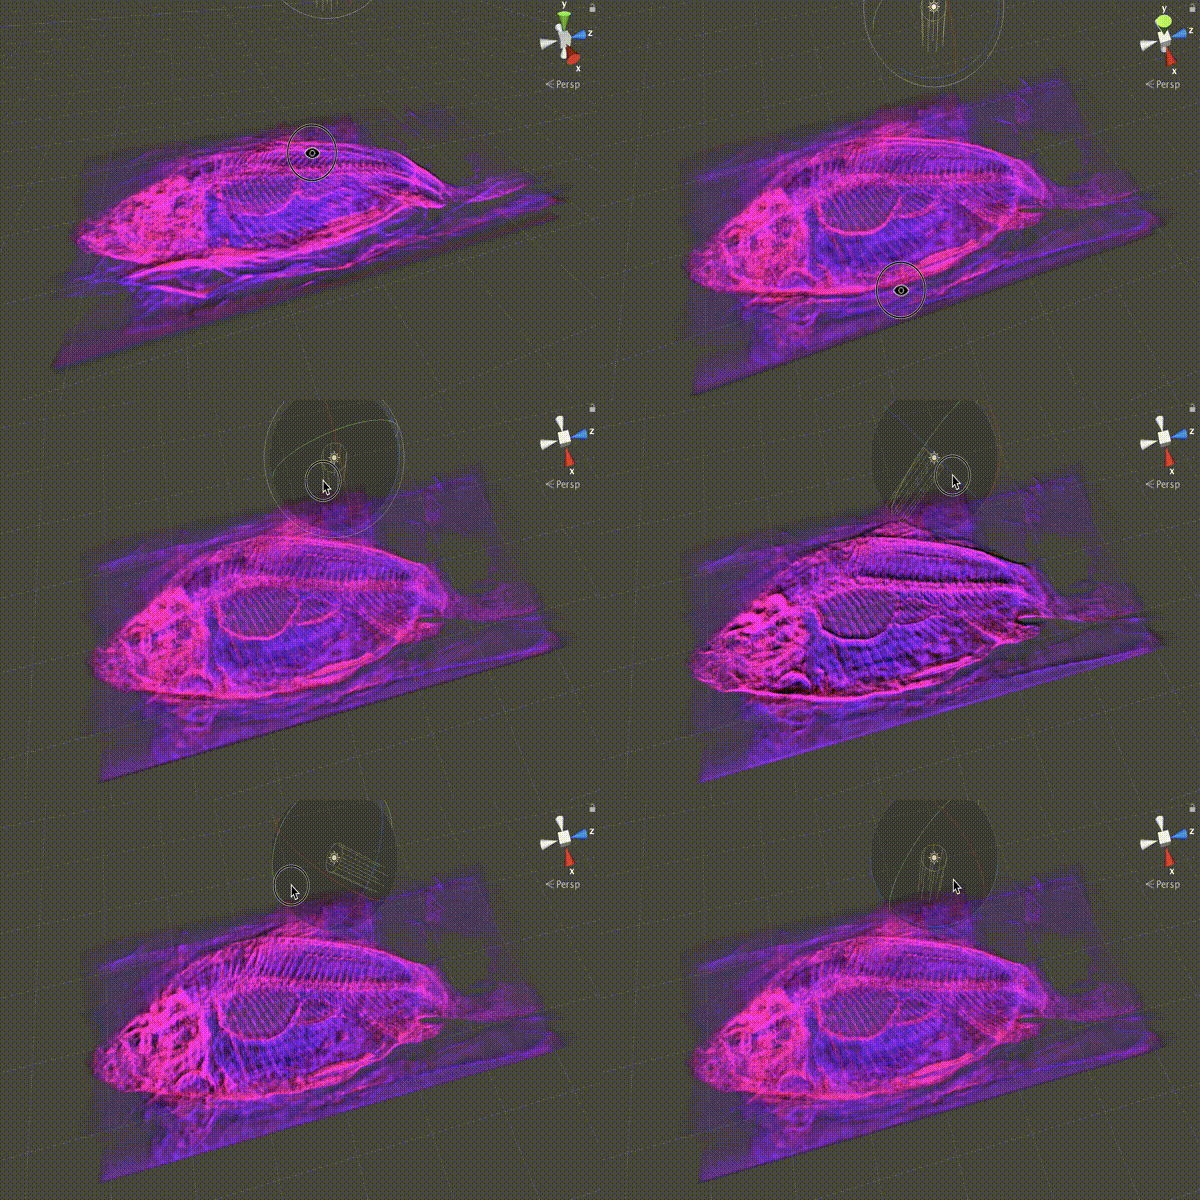
立体感が増してボリュームデータの視認性が上がります。
おわりに
ボリュームデータの色付けで見たい部位毎の視認性を上げたり、勾配を使ってライティングを行うことでより立体感を増すことが出来ました。
しかしながら依然としてキレイな結果を表示するためにはループ数を多くしなければならず、かなり計算が重いので、次回は再度計算の高速化をやりたいと思います。